

Table of Contents
Photo Mosaic in Photoshop
DIY Photo Mosaic Photoshop is a popular technique for creating stunning and unique photo collages. It involves arranging multiple images together to create a single image that looks like a mosaic. Photo mosaic portraits are particularly popular, as they allow you to create a detailed and intricate portrait using multiple smaller images.
To create a photo mosaic portrait using Photoshop, you’ll need to start by selecting your primary image. This will be the image that forms the basis of your mosaic. You can then choose a series of smaller images that will be used to create the individual tiles of the mosaic. These images can be anything – from other photos you’ve taken to stock photos you’ve downloaded online.
Once you have your images selected, it’s time to start creating your mosaic. There are a variety of different techniques you can use to create a mosaic picture in Photoshop, but one of the most common involves using the “Create Clipping Mask” feature.
To do this, you’ll need to select your primary image and then add a new layer on top of it. On this new layer, you’ll add the smaller images that you want to use as tiles for your mosaic. You can arrange these tiles in any way you like, but be sure to leave some space between them so that the primary image is still visible.
Next, you’ll need to select all of the smaller images on your new layer and then right-click and choose “Create Clipping Mask.” This will create a mask that only allows the smaller images to be visible in the areas where they overlap with the primary image. You can then adjust the size and position of the smaller images to create the final mosaic portrait.
Of course, this is just one technique for creating a photo mosaic in Photoshop, and there are many other approaches you can take. Some people prefer to use specialized software designed specifically for creating photo mosaics, while others prefer to create their mosaics manually using a variety of different tools and techniques.
Regardless of the approach you take, the key to creating a great photo mosaic is to carefully select your images and take the time to arrange them in a way that creates a cohesive and visually appealing final product. With a little bit of patience and practice, you can create stunning photo mosaic images that are sure to impress your friends and family.
In today’s tutorial, you will learn an easy way to create a Photo Mosaic in Photoshop. To create this portrait effect, you will require the main subject image and several images to create a Mosaic Pattern.
You can freely download images from Unsplash and Pexels. You can also have your own collection of images for creating a Photo Mosaic in Photoshop. This effect can be used to create a mosaic of couples, company employees, or family. It is a unique way of showing a group of people in one frame.

Let’s begin with the Photo Mosaic Photoshop Tutorial.
Firstly, select all the images except the main image and move them in a folder. Name this folder as Mosaic. Later on this folder will be used to create Mosaic Pattern. Thereafter, this Mosaic Pattern will be used to create a Photo Mosaic Portrait Effect in Photoshop.
Now follow the below-mentioned easy process of creating Photo Mosaic in Photoshop.
Step 1
Launch Adobe Photoshop and open the subject portrait image.

Step 2
Go to File > Automate > Contact Sheet II

In the Contact Sheet II dialogue box, select Folder from the drop down options and then click on Choose to locate the Mosaic Folder (created at the starting of the tutorial).
Under Document section, uncheck Flatten All Layers. You need to uncheck Flatten All Layers so that you can adjust the images within its layer mask. Set Units to inches and then set the Width, Height and Resolution.
Under Thumbnail section, uncheck Use Auto-Spacing. Set the values of Columns and Rows. I have set the values to 10 because the number of images selected for creating Mosaic Pattern is multiple of 10. So, according to the total number of images, you have selected, set the value of rows and columns. Then set Place to Across First and put a checkmark on Rotate For Best Fit.
After making all the necessary settings, click OK.

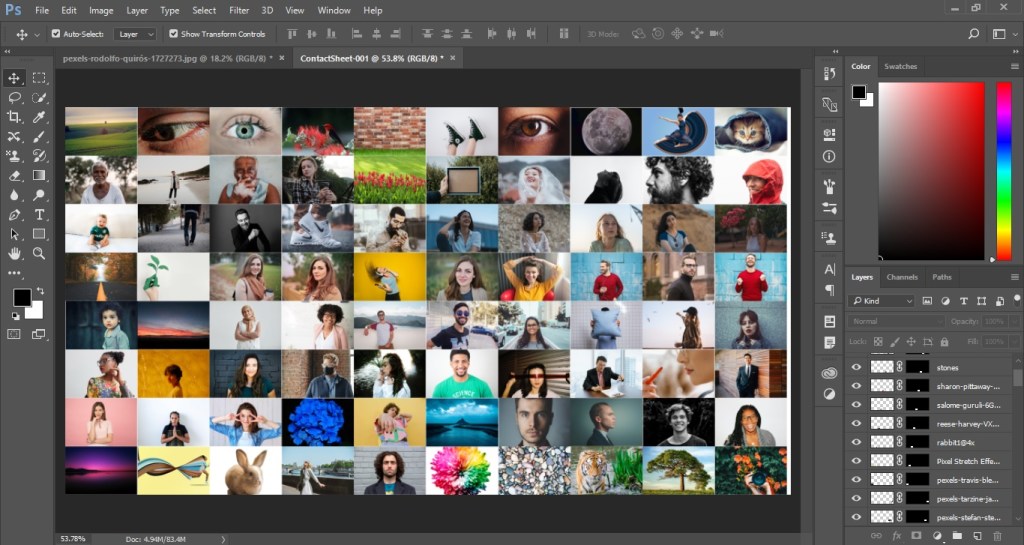
After clicking OK, photoshop will start arranging all the images in layers and layer mask.

Step 3
Now we need to adjust images in our Contact Sheet. You will see space between the images and we will fill those gaps with the help of the Move Tool and Transform Tool.
Select the Move Tool from the Tool Panel and put a checkmark on Auto-select. This will automatically select the layer in the Layers Panel on clicking on the image.
Select a image which you want to adjust. You will notice that the image layer will automatically get selected. Then click on the chain link to unlink the layer and the layer mask. Press Ctrl + T to activate the Free Transform. Now press and hold Shift + Alt key and increase the size of the image.


In this way adjust all the images create a nice Mosaic. Do remember to Unlink the layer mask in that particular image layer before adjusting the image.
Use the Crop Tool to crop out the extra white layer from the Mosaic.

Step 4
Now we will save this Mosaic as Pattern in Photoshop.
Go to Edit > Define Pattern. Give a name to your pattern and click OK.


Step 5
After saving the Pattern, go to your subject image and click on Create new fill or adjustment layer icon. Then select Pattern. You can adjust the Scale percentage in the Pattern Fill dialogue box and click OK.


Step 6
Change the Blending Mode of the Pattern to Overlay.

Step 7
In this step, we will adjust the Shadows/Highlights of the Subject Image.
Select the subject image layer and unlock it by clicking on the padlock icon. Then right-click on the layer and select Convert to Smart Object.

Go to Image > Adjustments > Shadows/Highlights. A dialogue box will appear. In that dialogue box, make adjustments and click OK.


So by following these above steps, you can create a photo mosaic in Photoshop.
Follow vividesigning.com for latest tutorial updates.
Practice this Photoshop Tutorial and share your views in the comment section. Also, share this tutorial with others.
FAQs
Is there a mosaic filter in Photoshop?
Yes, Photoshop offers a mosaic filter that can transform images into captivating mosaic artworks. This filter allows you to create intricate patterns by arranging smaller images or tiles to form a larger picture.
Where is mosaic in Photoshop?
In Photoshop, you can find the mosaic filter under the Filter menu. Navigate to Filter > Pixelate > Mosaic to access this feature, allowing you to pixelate images and create mosaic effects.
How do I make a photo collage in Photoshop?
Crafting a stunning photo collage in Photoshop is a creative endeavor. Import your desired images, arrange them on a canvas, experiment with layers and masks, and add personal touches to create a visually appealing composition.
Can you mosaic a picture?
Absolutely, you can mosaic a picture using various software, including Photoshop. By utilizing the mosaic filter or manually arranging smaller images or tiles, you can transform a single image into a captivating mosaic artwork.
How do I make a mosaic picture pattern?
Creating a mosaic picture pattern involves arranging smaller images or tiles to form a larger picture. In Photoshop, you can use the mosaic filter or apply this effect manually by strategically placing images to achieve a stunning pattern.
How to make a mosaic picture frame?
Designing a mosaic picture frame involves assembling smaller images or tiles around the edges of a central image. Use Photoshop to arrange the images, ensuring they complement and enhance the focal image within the frame.
How are mosaic pictures made?
Mosaic pictures are crafted by arranging smaller images or tiles in a specific pattern or design to create a larger image. This process can be done manually or with software like Photoshop, allowing for creative and visually striking compositions.

