

Table of Contents
- 1 Introduction To Insert an Image in Photoshop
- 2 Key Takeaway: What You’ll Learn
- 3 Methods to Insert an Image in Photoshop
- 4 FAQs – Inserting Images in Photoshop
- 4.1 1. What is the benefit of using Smart Objects when inserting images?
- 4.2 2. Can I edit the inserted image after I’ve placed it in Photoshop?
- 4.3 3. Are there any shortcuts for copying and pasting images in Photoshop?
- 4.4 4. How can I create a new document with the same dimensions when duplicating an image?
- 4.5 5. Is there a way to update a linked image in Photoshop if I make changes to the original file?
- 4.6 6. Can I insert multiple images into a single Photoshop document using these methods?
- 4.7 7. What file formats are supported for inserting images into Photoshop?
- 4.8 8. Can I resize the inserted images once they are in my Photoshop document?
- 4.9 9. Are there any tips for efficiently organizing and managing inserted images in a Photoshop document?
- 4.10 10. Can I apply filters or adjustments to the inserted images within Photoshop?
- 5 Tools Used in Photoshop for Image Insertion (with Names and Shortcuts):
- 6 Conclusion
- 7 Author
Introduction To Insert an Image in Photoshop
Are you ready to unleash your creativity and transform your digital art projects using Photoshop? Learning how to insert images in Photoshop is a fundamental skill that will open up a world of possibilities. In this beginner-friendly guide, we will explore three methods to seamlessly integrate images into your Photoshop documents. Whether you’re a novice or just looking to brush up on your skills, this step-by-step tutorial will empower you to take your digital art to the next level.
Key Takeaway: What You’ll Learn
By the end of this article, you’ll be able to:
– Insert images into Photoshop using the copy-and-paste method.
– Duplicate layers for image insertion without relying on keyboard shortcuts.
– Understand the concepts of linking and embedding images as Smart Objects.
– Choose the most suitable method for your creative needs and workflow.
– Enhance your image manipulation skills in Photoshop.
Methods to Insert an Image in Photoshop
Method 1: Copy & Paste
The Copy & Paste method is a favorite among Photoshop users due to its efficiency and convenience. We’ll walk you through the process step by step.
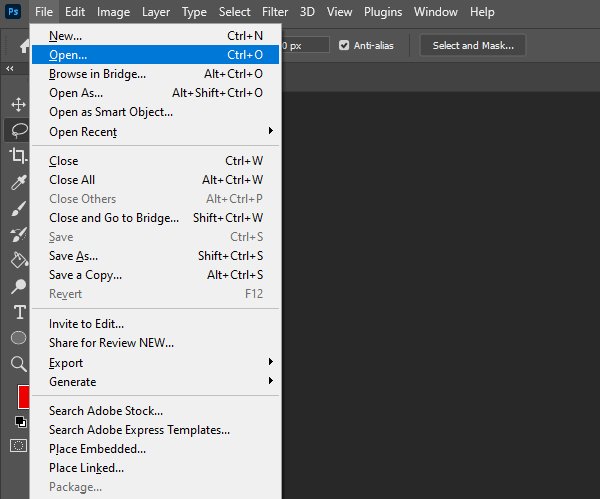
Step 1: Open Your Image: Start by opening your main Photoshop document and the image you want to insert. Use the keyboard shortcut Command + O (Ctrl + O for PC) to open your image.
Step 2: Select All Pixels: Click on your image, and use the standard keyboard shortcut Command + A (Ctrl + A for PC) to select all the pixels in your image. You’ll see a selection marquee appear around your image.
Step 3: Copy Your Selection: With the pixels selected, press Command + C (Ctrl + C for PC) to copy your selection to your computer’s clipboard.
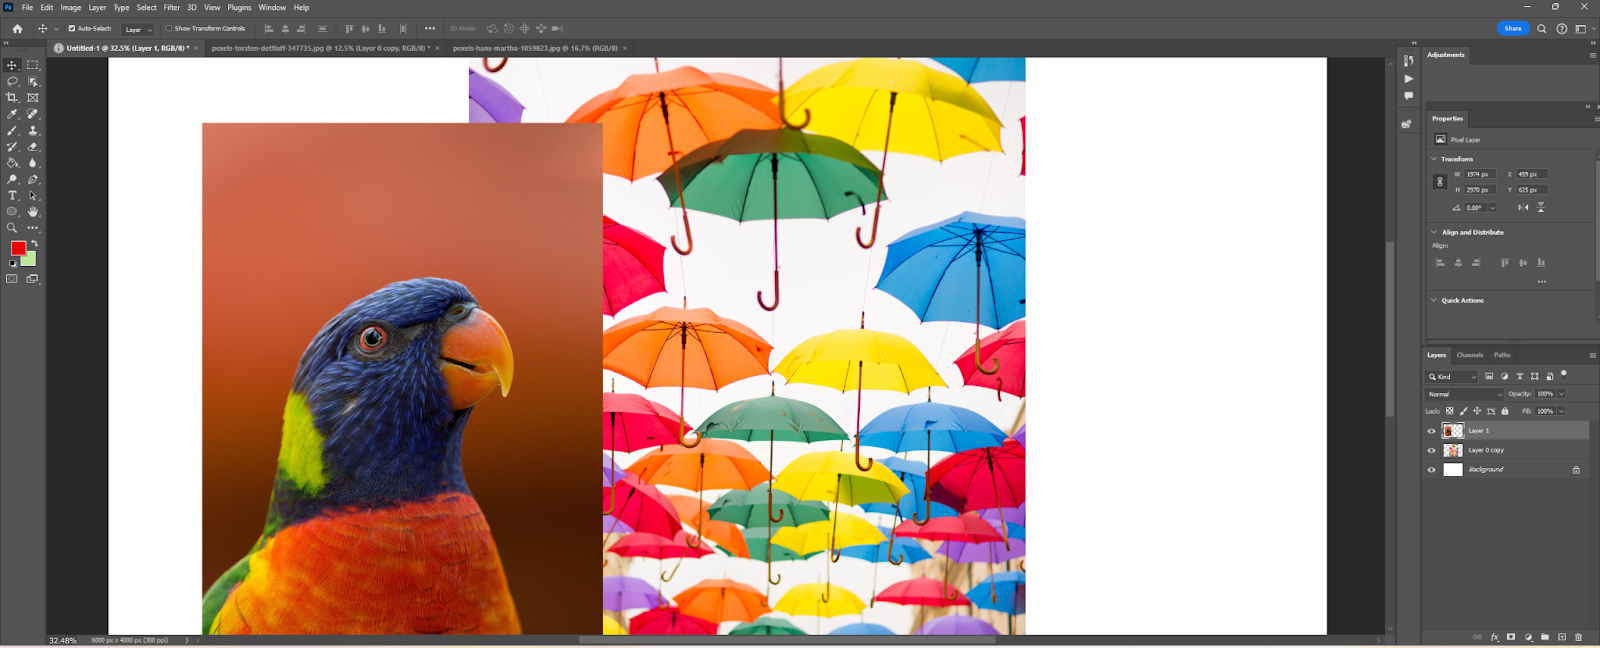
Step 4: Paste the Image: Switch back to your main Photoshop document and use Command + V (Ctrl + V for PC) to paste the image. Photoshop will create a new layer with the copied pixel data, allowing you to edit and manipulate the image further.
Method 2: Duplicate
If you prefer not to use keyboard shortcuts and temporary clipboards, the Duplicate method is an excellent alternative.
Step 1: Open Your Image: Similar to the first method, open both your main Photoshop document and the image you want to insert.
Step 2: Duplicate Layer: Locate the Layers panel in the bottom left corner of the interface. Right-click on the layer entry and select “Duplicate Layer.” A dialog box will appear.

Step 3: Configure the Duplicate: In the dialog box, enter a descriptive name for the duplicated layer. Use the Document dropdown menu to select the document you want to insert the image into. You can even create a new document with the same dimensions if needed.
Method 3: Linking And Embedding Images
Linking and embedding images as Smart Objects offer unique advantages in Photoshop. Let’s explore both options.
Linking (Place Linked):
Step 1: Open your main Photoshop document and go to the File menu. Select “Place Linked.”
Step 2: Insert Image as a Placeholder: The image you see is a placeholder thumbnail representing the original file. Edits to the linked file require opening the original but can be refreshed in your document.
Embedding (Place Embedded):
Step 1: Open your main Photoshop document and go to the File menu. Select “Place Embedded.”

Step 2: Image as a Smart Object: Photoshop creates a Smart Object containing the image, which is visible in your primary document. You can edit it using standard Photoshop commands.
FAQs – Inserting Images in Photoshop
1. What is the benefit of using Smart Objects when inserting images?
Smart Objects allow for non-destructive editing and scaling of images, preserving their quality.
2. Can I edit the inserted image after I’ve placed it in Photoshop?
Yes, the ability to edit depends on whether you’ve linked or embedded the image. Linked images require edits in the original file, while embedded images are editable in Photoshop.
3. Are there any shortcuts for copying and pasting images in Photoshop?
Absolutely! Use Command + C to copy and Command + V to paste (Ctrl + C and Ctrl + V for PC).
4. How can I create a new document with the same dimensions when duplicating an image?
While duplicating a layer, you can select the option to create a new document with the same dimensions.
5. Is there a way to update a linked image in Photoshop if I make changes to the original file?
Yes, you can refresh the link to update the placeholder thumbnail in your primary document when changes are made to the original file.
6. Can I insert multiple images into a single Photoshop document using these methods?
Yes, you can insert multiple images into a single document by repeating the steps for each image. Each image will be placed as a separate layer, allowing you to arrange and edit them as needed.
7. What file formats are supported for inserting images into Photoshop?
Photoshop supports a wide range of image file formats, including JPEG, PNG, TIFF, PSD (Photoshop’s native format), and more. You can insert images in most common formats.
8. Can I resize the inserted images once they are in my Photoshop document?
Yes, you can resize the inserted images by selecting the layer containing the image and using the Transform tool (Command + T or Ctrl + T for PC). This allows you to adjust the size while maintaining image quality.
9. Are there any tips for efficiently organizing and managing inserted images in a Photoshop document?
To keep your project organized, consider naming your layers descriptively and using layer groups (folders) to group related layers together. This makes it easier to locate and edit specific images within your document.
10. Can I apply filters or adjustments to the inserted images within Photoshop?
Yes, you can apply various filters, adjustments, and effects to the inserted images using Photoshop’s extensive range of tools and options. Experiment with filters like Blur, Sharpen, and various adjustment layers to enhance your images.
Tools Used in Photoshop for Image Insertion (with Names and Shortcuts):
| Tool | Shortcut | |||
| Open | Command + O (Ctrl + O for PC) | |||
| Select All | Command + A (Ctrl + A for PC) | |||
| Copy | Command + C (Ctrl + C for PC | |||
| Paste | Command + V (Ctrl + V for PC) |
Conclusion
In conclusion, mastering the art of inserting images in Photoshop is a vital skill for any digital artist or designer. With these three methods at your disposal, you can seamlessly integrate images into your projects and take your creativity to new heights. Experiment, explore, and create stunning digital art with Photoshop!
