

Table of Contents
- 1 Unlock Your Creative Potential with Curved Lines in Photoshop
- 2 Key Takeaway: What You’ll Learn
- 3 Tools Used in Photoshop for Drawing Curved Lines (with Names and Shortcuts):
- 4 Bonus Technique: Creating Custom Brushes for Curved Lines
- 5 Using Curved Lines in Design Projects
- 6 Troubleshooting Common Issues
- 7 Practice and Skill Development
- 8 FAQs – Drawing Curved Lines in Photoshop:
- 8.1 1. What is the Pen Tool, and why is it important for drawing curved lines in Photoshop?
- 8.2 2. How do I switch between the Pen Tool and the Curvature Pen Tool in Photoshop?
- 8.3 3. What are anchor points and control handles, and how do they affect curved lines?
- 8.4 4. Can I edit curved lines after drawing them, and if so, how?
- 8.5 5. What are some creative ways to use custom brushes for curved lines in design projects?
- 8.6 6. Are there any keyboard shortcuts to streamline the process of drawing curved lines in Photoshop?
- 8.7 7. How do I troubleshoot issues like jagged or uneven curved lines in my designs?
- 8.8 8. How do I apply gradients to objects, shapes, text, or lines in Photoshop?
- 8.9 9. What are some advanced techniques for creating complex curved shapes in Photoshop?
- 9 Conclusion
- 10 Author
Unlock Your Creative Potential with Curved Lines in Photoshop
Are you ready to start your creative journey in Photoshop? Learning how to draw curved lines is a fundamental skill that opens the door to countless artistic possibilities. In this beginner-friendly guide, we’ll explore the art of drawing curved lines in Photoshop, demystify the Pen Tool, and introduce you to the Curvature Pen Tool. By the end of this article, you’ll be equipped with the skills to create smooth and precise curved lines for your digital art and design projects. Let’s dive in!
Key Takeaway: What You’ll Learn
– Master the Pen Tool and Curvature Pen Tool in Photoshop.
– Draw basic and complex curved lines with ease.
– Customize strokes and fills to enhance the appearance of your lines.
– Troubleshoot common issues when working with curved lines.
– Apply your newfound skills to real-world design projects.
Tools Used in Photoshop for Drawing Curved Lines (with Names and Shortcuts):
| Tool | Shortcut | ||||||
| Pen Tool | Command P or Ctrl-P | ||||||
| Curvature Pen Tool | Shift + P | ||||||
| Selection Tool | Command V or Ctrl-V | ||||||
| Direct Selection Tool | Command A or Ctrl A | ||||||
| Eraser Tool | Command E or Ctrl-E | ||||||
| Stroke and Fill Options | Right-Click on Layer |
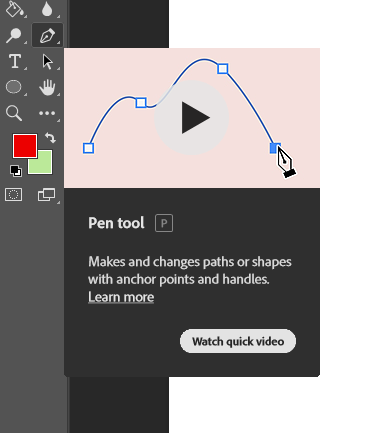
Step 1: Understanding the Pen Tool
The Pen Tool is a versatile tool in Photoshop used for creating precise shapes and lines. It’s especially handy for drawing curved lines.
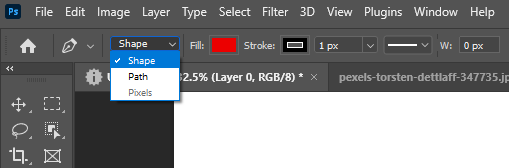
Step 2: Basic Steps to Draw Curved Lines
In the options bar at the top of the main document window, make sure that the type dropdown menu is set to Shape, not Path (see below).
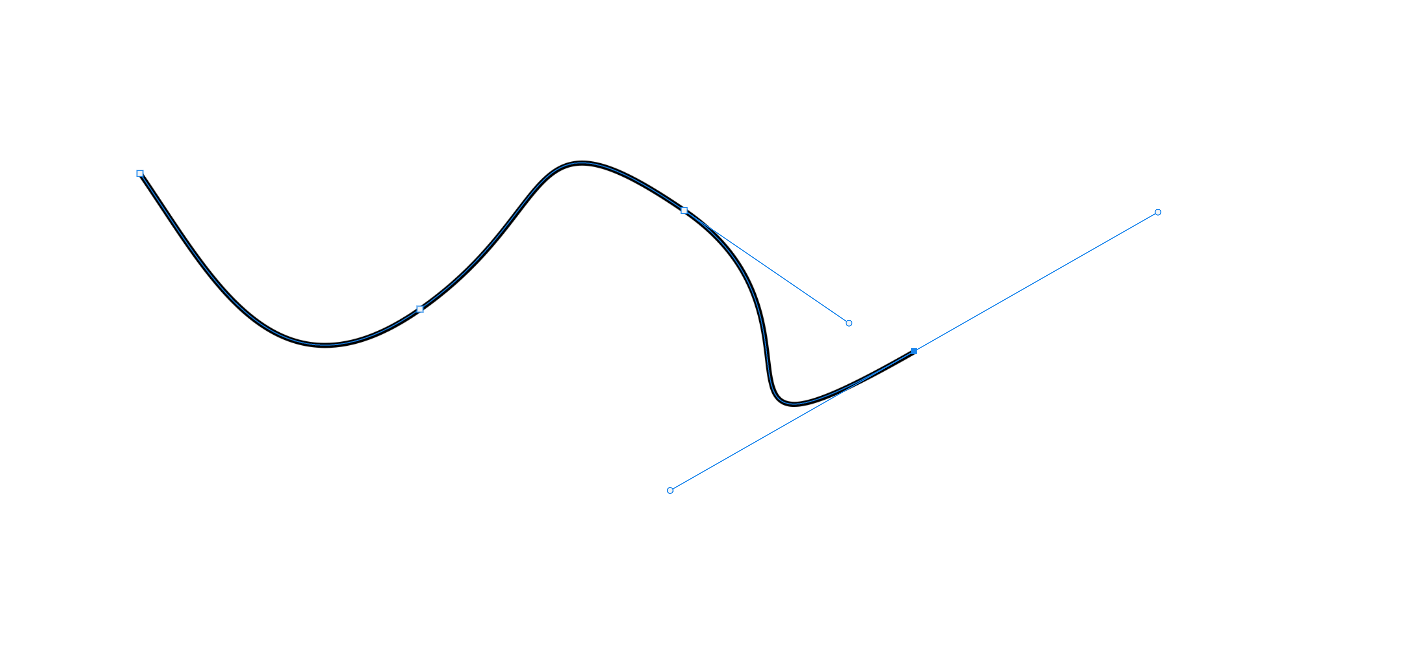
Step 3: Drawing Complex Curved Shapes
To create intricate curved shapes, follow the same steps as drawing basic curves, adding more anchor points for finer control. Click and drag the control handles to manipulate the curves between anchor points.
Step 4: Utilizing the Curvature Pen Tool
For a more intuitive approach to drawing curved lines, try the Curvature Pen Tool (Shift + P). It simplifies the process by allowing you to click and create curved segments directly, without the need for anchor points and control handles. This tool is great for beginners.
Step 5: Modifying and Editing Curved Lines
To edit curved lines after drawing them, use the Selection Tool (V) to select and move anchor points. The Direct Selection Tool (A) is handy for adjusting control handles to refine the shape of curves.
Step 6: Applying Stroke and Fill to Curved Lines
Enhance the appearance of your curved lines by adding strokes and fills. Right-click on the layer containing your curved line, choose “Blending Options,” and explore stroke and fill settings to customize line width, color, and style.
Bonus Technique: Creating Custom Brushes for Curved Lines
Take your creativity up a notch by designing custom brushes for unique curved line effects. Once you’re happy with the shape of your curved line, open the Paths panel. If you’re not familiar with it, it’s nested in the same tab group as the Layers panel in the bottom right corner of the interface.

In the Paths panel, you should see your active path, probably with the default name Work Path. Right-click it, and select Stroke Path from the popup menu.

Photoshop will open the Stroke Path dialog box, which allows you to select from an impressive list of brush-based tools, as well as ask it to simulate the effects of a pressure-sensitive drawing tablet.

Using Curved Lines in Design Projects
Curved lines are versatile and can be used in various design projects. Whether you’re crafting logos, illustrations, or digital art, incorporating well-placed curved lines can add a touch of elegance and dynamism to your work.
Troubleshooting Common Issues
Encountering jagged or uneven curved lines? Ensure that your anchor points are correctly placed, and control handles are adjusted for smooth transitions. Experiment and practice to refine your skills.
Practice and Skill Development
As with any skill, practice is key to mastery. Start with basic curved lines and gradually progress to more complex shapes. Explore online tutorials and resources to further hone your skills in creating beautiful curved lines in Photoshop.
FAQs – Drawing Curved Lines in Photoshop:
1. What is the Pen Tool, and why is it important for drawing curved lines in Photoshop?
The Pen Tool is a versatile tool used for creating precise shapes and lines in Photoshop. It’s crucial for drawing curved lines due to its ability to provide fine control over anchor points and control handles.
2. How do I switch between the Pen Tool and the Curvature Pen Tool in Photoshop?
You can switch between the Pen Tool and the Curvature Pen Tool by pressing “P” for the Pen Tool and “Shift + P” for the Curvature Pen Tool.
3. What are anchor points and control handles, and how do they affect curved lines?
Anchor points are points on a path where curves change direction. Control handles are used to manipulate the shape of the curve between anchor points, affecting the curve’s smoothness.
4. Can I edit curved lines after drawing them, and if so, how?
Yes, you can edit curved lines by selecting and moving anchor points using the Selection Tool (V). The Direct Selection Tool (A) allows you to adjust control handles for precise edits.
5. What are some creative ways to use custom brushes for curved lines in design projects?
Custom brushes can add unique textures and effects to your curved lines. Experiment with brush settings, opacity, and flow to achieve creative and artistic results in your designs.
6. Are there any keyboard shortcuts to streamline the process of drawing curved lines in Photoshop?
Yes, keyboard shortcuts like “P” for the Pen Tool and “Shift + P” for the Curvature Pen Tool can help streamline the process of drawing curved lines.
7. How do I troubleshoot issues like jagged or uneven curved lines in my designs?
Jagged or uneven curved lines can be resolved by ensuring proper placement of anchor points and adjusting control handles for smoother curves. Regular practice also improves precision.
8. How do I apply gradients to objects, shapes, text, or lines in Photoshop?
In Photoshop, you can apply gradients to various elements, including shapes, text, and lines. Select the object you want to apply a gradient to, then go to the “Layer Style” dialog by double-clicking the layer or right-clicking and choosing “Blending Options.” Within the “Layer Style” dialog, navigate to the “Gradient Overlay” option to customize gradients for your objects.
9. What are some advanced techniques for creating complex curved shapes in Photoshop?
Advanced techniques for creating complex curved shapes involve precise placement of anchor points and strategic use of control handles. Experimentation and practice are key to mastering these techniques.
Conclusion
Mastering the art of drawing curved lines in Photoshop empowers you to bring your creative visions to life. Whether you’re a digital artist, illustrator, or designer, these skills are invaluable for crafting visually stunning and dynamic compositions. So, grab your digital canvas and start creating captivating curved lines in Photoshop today!
