Table of Contents
Isometric Building in Adobe Illustrator
In today’s tutorial, we will create Isometric Building in Adobe Illustrator with the help of the Rectangle Tool, Ellipse Tool, Pen Tool, 3D Effect, and Transform Tool.
Launch Adobe Illustrator and create a new document. Now follow the below steps:
Step 1
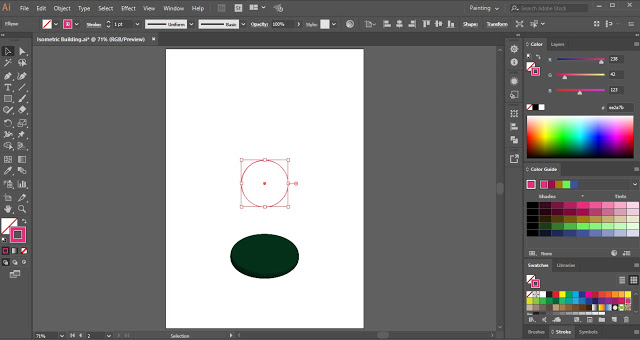
Select the Ellipse Tool and draw a circle on the artboard. Fill the circle with #05361cand turn off the stroke color.
Step 2
Make sure that the circle is selected and then click on Effect in the Menu Bar. Place the cursor on 3D and selected Extrude and Bevel.
3D Extrude & Bevel Options dialogue box will appear on the artboard. In that dialogue box, put a checkmark on Preview and then change the position of the selection to Isometric Top.
We are creating the base of the Isometric Building so we will reduce the Extrude for this shape. (See the below image)
Step 3
Again select the Ellipse Tool and draw a circle smaller than the circle drawn in Step 1. Turn off the Fill and the stroke color is #ee2a7b.
We will apply 3D Extrude & Bevel Effect to this circle also and this time we will increase the Extrude points. (See the below image)
Step 4
Now select the Pen Tool from the Tool Panel and turn off the stroke color. The Fill color is #bb6884.
With the help of Pen Tool, we will draw the roof of our Isometric Building.
Step 5
As created in the above two steps; i.e.; Step 3 and Step 4, we will create a similar floor for the Isometric Building which will be small in size. (See the below image)
Now select the Pen Tool and draw a stroke line filled with #ee2a7b. Then draw a sphere above it.
Step 6
In this step, we will create gates for our Isometric Building.
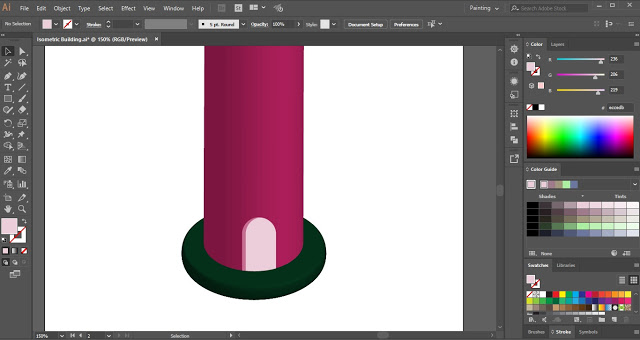
Select the Rectangle Tool and draw a rectangle the same as the size of the door you want to create for the Isometric Building.
The color filled in the rectangle is #eccedb.
Now select the Direct Selection Tool from the Tool Panel. Press & hold the Shift key and select the top two anchor points and drag them towards the center to make the edges round. (See the below image)
Now select the Pen Tool and draw a curve shape stroke as shown in the below image.
Then select the curve shape stroke and the door shape and click on the Shape Builder Tool in the Tool Panel. Press & hold the Alt key and click on the area of the door shape which is below the curved shape stroke. This will remove that part of the shape. Later on, remove the curved shape stroke also.
Now select the door shape and press Ctrl + C to copy it and press Ctrl + B to paste it at the back. Change the fill color of the shape pasted at the back to #c76d92. Then drag the shape pasted at the back slightly towards the left to create an effect.
Create a duplicate copy of the door and reduce its size. Then place it on the top floor of the Isometric Building.
Step 7
In this step, the windows will be created. The process of creating the windows is similar to the process followed in the above step. But for creating the door we have used Rectangle Tool and for the windows, we will use Ellipse Tool.
Select both the shapes of the window and press Ctrl + G to group them.
Now let the window be selected and press Shift + Ctrl + M to open the Move dialogue box.
In that dialogue box, set the position of Vertical move to 30 pt and click on Copy.
Press Ctrl + D to create more copies of the window.
This is how you can create an Isometric Building in Adobe Illustrator.
Practice this tutorial and share your views in the comment section. Also, share this tutorial with others.


