
Table of Contents
Design a SPYGLASS LOGO in Adobe Illustrator
In today’s tutorial, we will Design a spyglass logo in Adobe Illustrator with the help of the Envelope Distort. Other tools that we will use are Type Tool and Shape Tools.

The name of the company which we have chosen for our logo is MYSTERY WORLD. So the design of the logo will be such that it relates to the name of the company.
Let’s begin with the tutorial.
Launch Adobe Illustrator and create a document of 841.89 pt X 595.276 pt with RGB color mode.
Now follow the below-mentioned steps:
Step 1
Select the Ellipse Tool from the Tool Panel and draw a circle of size 245 X 245 pt. The fill color is disabled and the stroke color is black. (#000000)
After drawing the circle, go to the Stroke Panel and increase the size of the stroke from 1 pt to 7 pt.

Now with the help of the Selection Tool (V) select the circle and click on Object in the Menu Bar. Place the cursor on Path and select the Offset Path.

Now create a -10 point Offset Path. Check the Preview and click OK.

Step 2
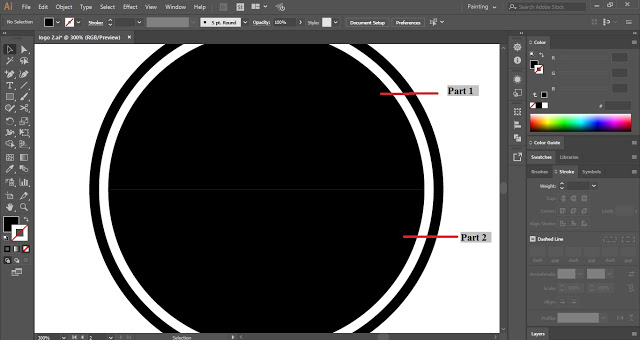
After creating the Offset Path, swap the Fill and Stroke. Now, the stroke will be disabled, and the fill color will be black.

Now, we will divide the inner circle into two parts. Select the Line Segment Tool from the Tool Panel and draw a straight line from the left anchor point to the right anchor point of the circle.

After drawing the line, select the inner circle and the line. Go to the Pathfinder Panel and click on Divide. Now Ungroup the selection and the inner circle will get divided into two parts.
Step 3
Select the Type Tool and type the two words- MYSTERY & WORLD in two separate type boxes.

Select the first half part of the inner circle and right-click to bring it in the front.

Now select the word MYSTERY and the first half part of the inner circle. Click on Object in the Menu Bar and place the cursor on Envelope Distort and select Make with Top Object.


Now do the same with the word- WORLD.

Step 4
In this step, we will create a background for our text and will also change the color of our text.
Select the outer stroke and create an Offset Path of -10 pt. (As done in Steps 1 and 2 to create an inner circle.)
After creating the black inner circle double click on the text to isolate the layer and then change the font color to white.


Similarly, change the font color of the other text.

Step 5
The words are giving an effect as they are under a magnifying glass. So we will give our logo the shape of a magnifying class.
Select the Rectangle Tool and draw two rectangles, one of small size and the other will be larger as compared to the first.

Select the Direct Selection Tool and round the edges of the larger rectangle.

Place both the rectangles close to each other and select them. Now go to the Pathfinder Panel and select Unite. The handle of the magnifying glass is created. Now place it in the right place.

Step 6
With the help of Type on a Path Tool, type a tagline above the logo and year of establishing below the shape. If you want you can add effect to your logo. I have applied the FilmGrain Effect on the inner circle.

So this is how you can Design a Logo in Adobe Illustrator which relates to the name and work of the company. Also, the design of the logo should be such that when you reduce the size of the logo, the fonts and the shapes are clearly visible.
Practice this tutorial and share your views in the comment section. Also, share this tutorial with others.
