

Table of Contents
Pop Art Photo Effect
Pop art is a vibrant and popular art movement known for its bold colors, strong contrasts, and graphic style. With Adobe Photoshop, you can easily create stunning pop art effects to give your images a retro and eye-catching look.
By applying pop art filters and effects in Photoshop, you can transform ordinary photos into visually striking and dynamic pieces of art. The pop art effect typically involves using bright and saturated colors, halftone patterns, and bold outlines to mimic the style of comic books and commercial printing techniques.
In Photoshop, you can utilize various techniques to achieve a pop art effect. This includes using filters such as the “Cutout” or “Posterize” filters to simplify shapes and create a graphic look. Additionally, you can experiment with adjustment layers, blending modes, and layer styles to enhance colors, contrast, and texture.
One popular approach is to convert a photo into a pop art style by using techniques like duplicating layers, adjusting color levels, and applying halftone patterns. This allows you to emphasize certain elements in the image, such as facial features or objects, and make them stand out in a bold and graphic manner.
There are also many online tutorials and resources available that provide step-by-step instructions on creating pop art effects in Photoshop. These tutorials offer valuable insights into the different techniques and settings you can use to achieve the desired pop art look.
With Adobe Photoshop’s extensive set of tools and features, you have the creative freedom to experiment and customize your pop art creations. Whether you want to recreate the iconic style of Andy Warhol or put your unique spin on the pop art aesthetic, Photoshop provides the necessary tools to bring your vision to life.
Adobe Photoshop is a powerful tool for creating impressive pop art effects. By exploring filters, adjustment layers, and various techniques, you can transform your photos into captivating pop art masterpieces. Unleash your creativity and have fun experimenting with different styles and approaches to achieve the vibrant and energetic look of pop art.
In this Photoshop Effect Tutorial, we will turn a portrait into a Pop Art Style photo. It is a fun tutorial in which you can convert any image into a late 1960s Pop Art Effect in Photoshop. Pop Art Effect colors make a photo stand out which makes it look more attractive.
We will use some filters, adjustment layers, and photoshop tools to create Pop Art Effect in Photoshop.
Select a Cool Portrait for creating the Pop Art Effect, and then follow the below-mentioned steps:
Step 1
Open an image in Photoshop as a new document.

Step 2
Click on the Quick Selection Tool and make a selection of the model image.

Now click on Add Vector Mask button in the Layers Panel to add a Layer Mask.

Click on the Select and Mask button in the Options Bar to refine the selection.


Step 3
Create a new layer below the original layer (Layer 0) and name it as Background Layer. Fill the Background Layer with White color. You can also fill it with any color of your choice.

Step 4
Now select the original layer (Layer 0) and click on Create New Fill or Adjustment Layer. From the options list, select Black & White Adjustment Layer.


Step 5
Select all the three layers and Convert to Smart Object.

Step 6
Select Black as Foreground Color and go to Filter > Filter Gallery > Halftone Pattern. Select Pattern Type as Dot, reduce the Contrast to 0, and then set the Size of the Dot.
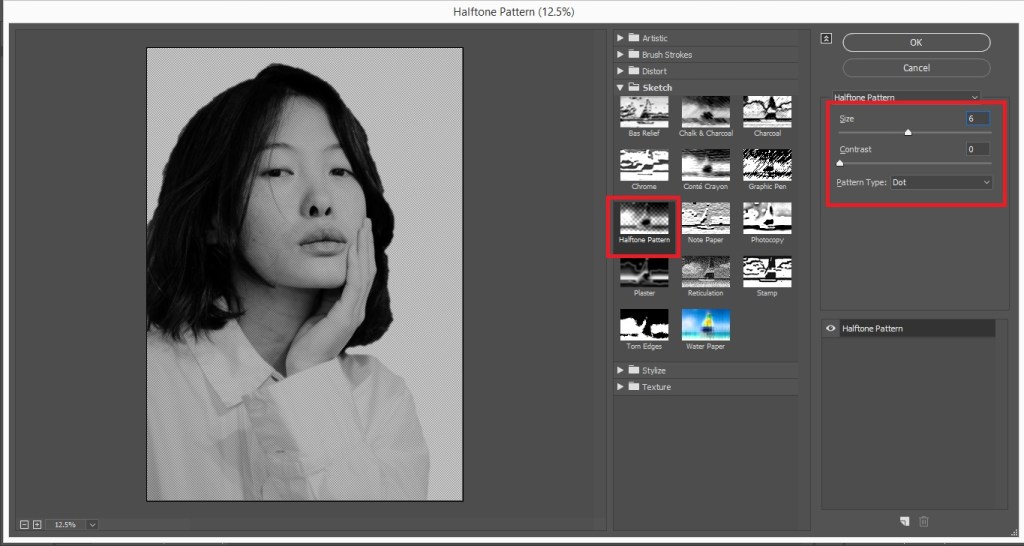
Click OK to apply the Halftone Pattern Filter.

Step 7
Go to Filter > Sharpen > Smart Sharpen.

Click OK to apply the Smart Sharpen Filter.
Now change the blending mode to Linear Burn.

Step 8
Now create a new layer below the current layer and pick a foreground color. Using the Paint Bucket Tool fill the new layer with the selected foreground color.

Step 9
Now select the Paint Brush Tool and change the Foreground Color. Then start painting over different areas of the model.


This is the fun way of creating Pop Art Effect in Photoshop.
Practice this Pop Art Photoshop Tutorial and create your own Pop Art Portrait.
Share this PhotoshopTutorial with others and also share your views in the comment section.
