

Introduction
Circular text in Photoshop is a creative marvel, a gateway to a design wonderland. Whether you’re crafting logos, adding watermarks, or breathing life into your artistic designs, mastering the art of circular text opens up a world of possibilities.
But here’s the twist: using the warp tool, while tempting, isn’t the wisest path to tread. It can lead to distorted letters and flattened circles, making your creations look far from professional. So, let’s embark on a journey through the best way to create circular text in Photoshop and kiss those warp tool woes goodbye.
Why We Don’t Use the Warp Tool
The warp tool, once hailed as a savior, comes with its set of limitations and issues. It’s a double-edged sword that often leaves us with jagged edges. Distorted letters and circles that appear as if they’ve gone through a wringer are not what you signed up for.
Picture this: your beautifully crafted text, contorted beyond recognition, with a circle that has lost its curves. A visual reference is all it takes to understand why the warp tool is not our best bet.

The Best Way to Make Circular Text
Now, let’s unveil the best-kept secret for achieving circular text perfection in Photoshop. It’s a step-by-step journey, my friends, and it’s worth every click.
Step 1: Set Up Some Guides
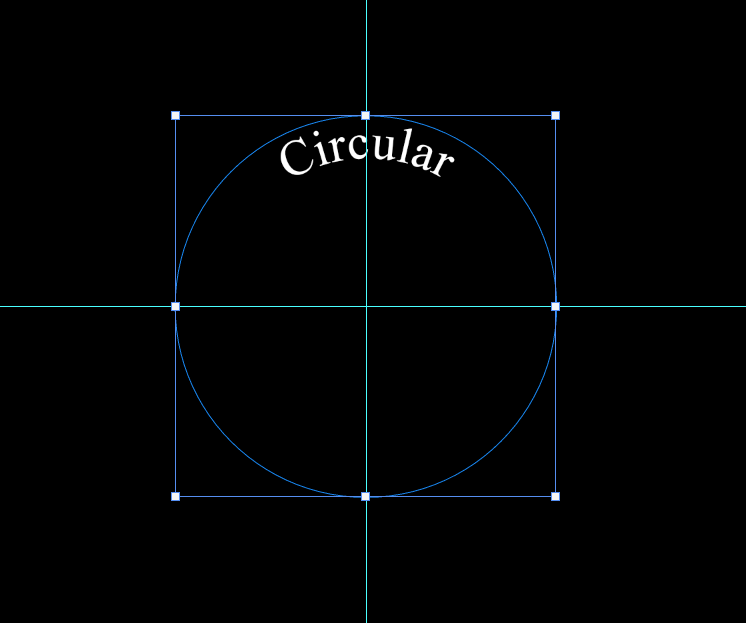
Before you dive into the world of circular text, you’ll need some guidance, quite literally. To ensure your circle sits smack in the center, create vertical and horizontal guides. These will be your trusty companions in the journey to perfection.
In the grand canvas of Photoshop, open a new document using the command Ctrl + N or Command + N . Make it any size your creative heart desires, but for now, let’s stick to a square for our central circle.
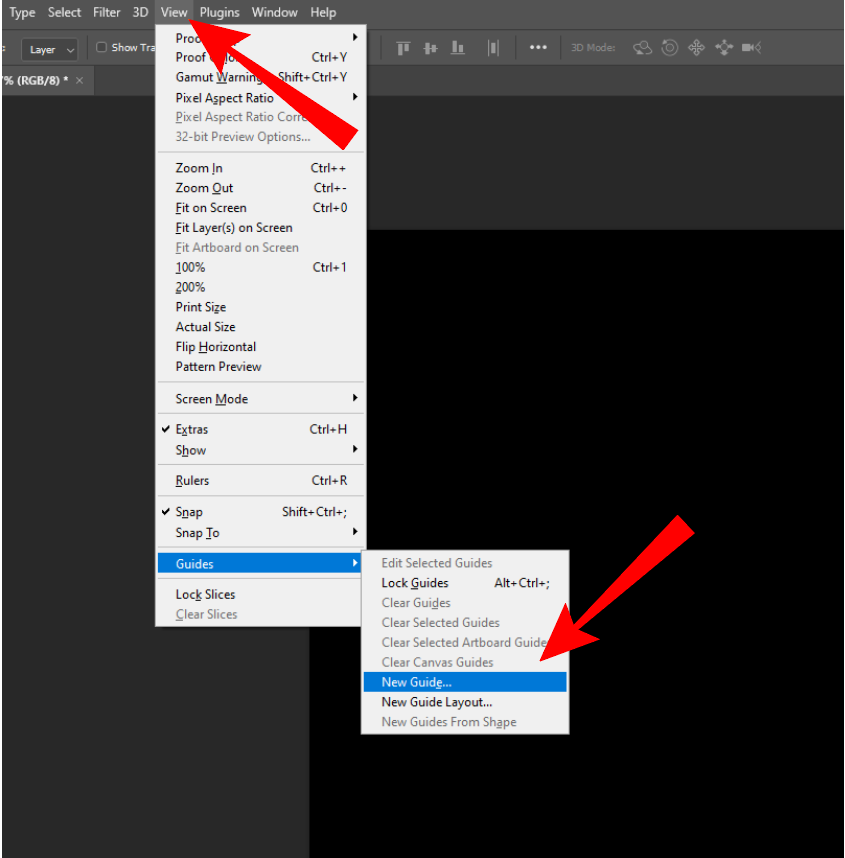
Finding the center of your canvas is your next quest. Head over to the “View” tab in the menu bar, and there, hidden amongst the options, you’ll find your beacon of hope— “New Guide.“
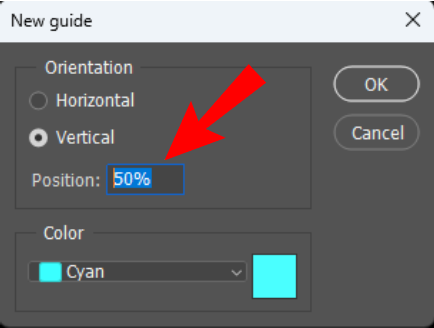
Select either the vertical or horizontal orientation and place 50% in the Position box. This is your halfway point, a meeting place for all things circular.
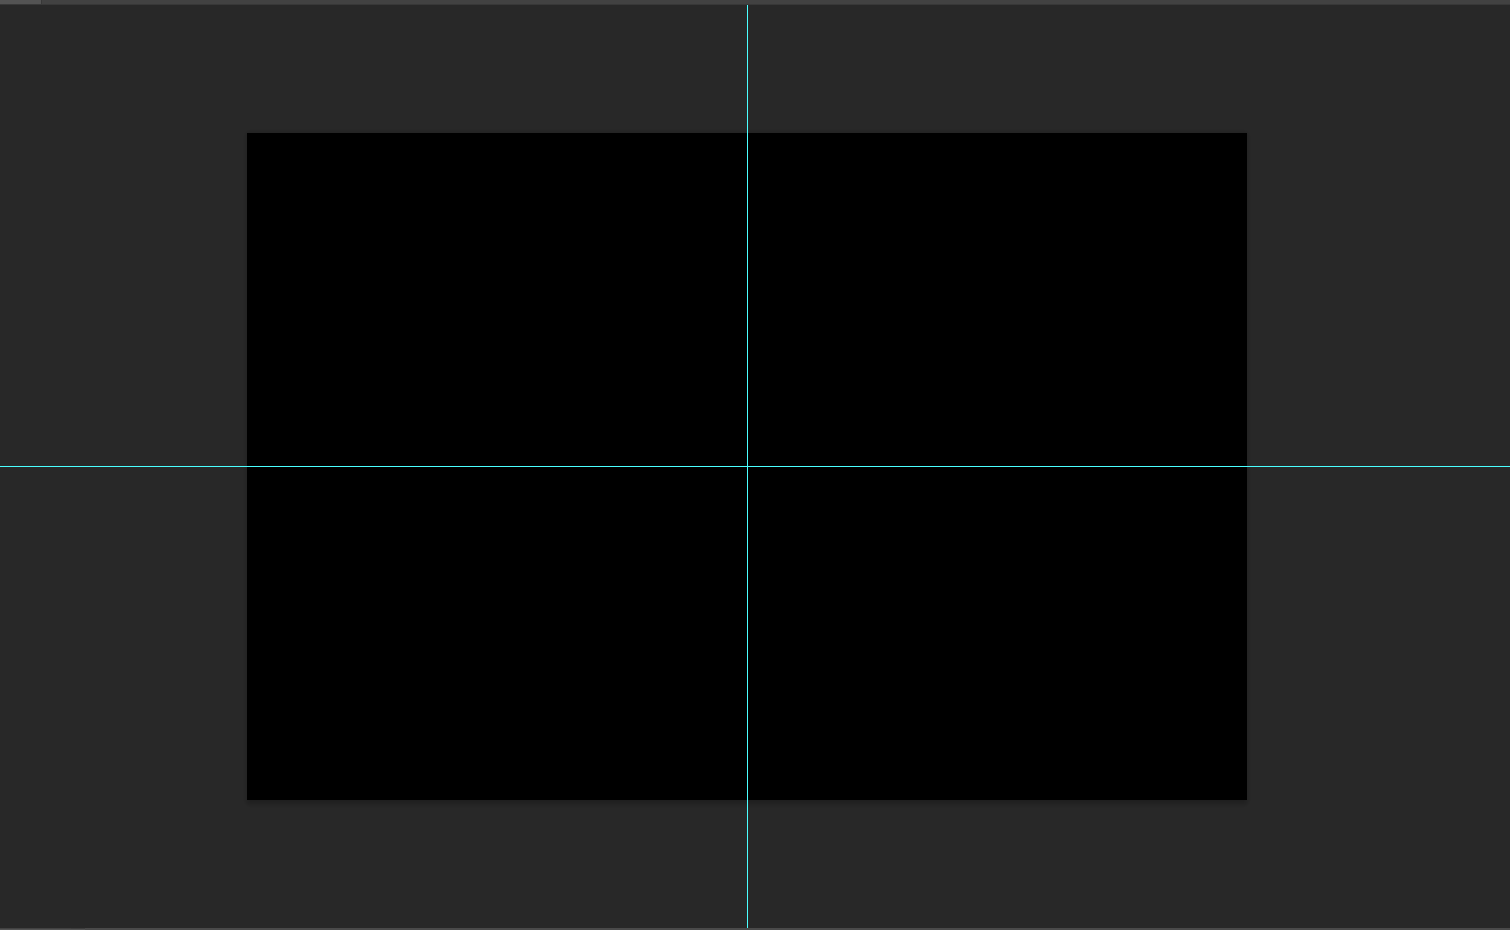
Repeat this ritual one more time, this time with the other orientation. You’ll end up with two guides intersecting perfectly in the center of your canvas.
Step 2: Draw a Circle
With your guides in place, it’s time to create the stage for your circular text. Grab the Ellipse tool from your trusty toolbar, which might be hiding behind its siblings.
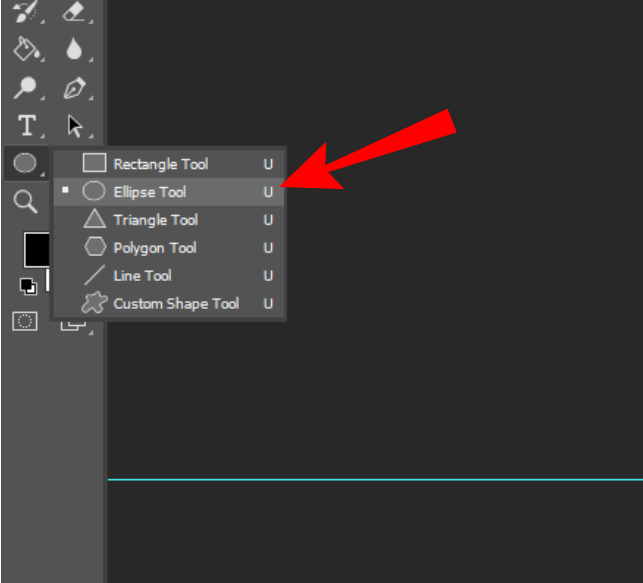
Click and drag your mouse from the point where your guides share an intimate moment.
But wait, there’s more! Hold down the Alt and Shift keys (or Option and Shift on a Mac) while you’re dragging.
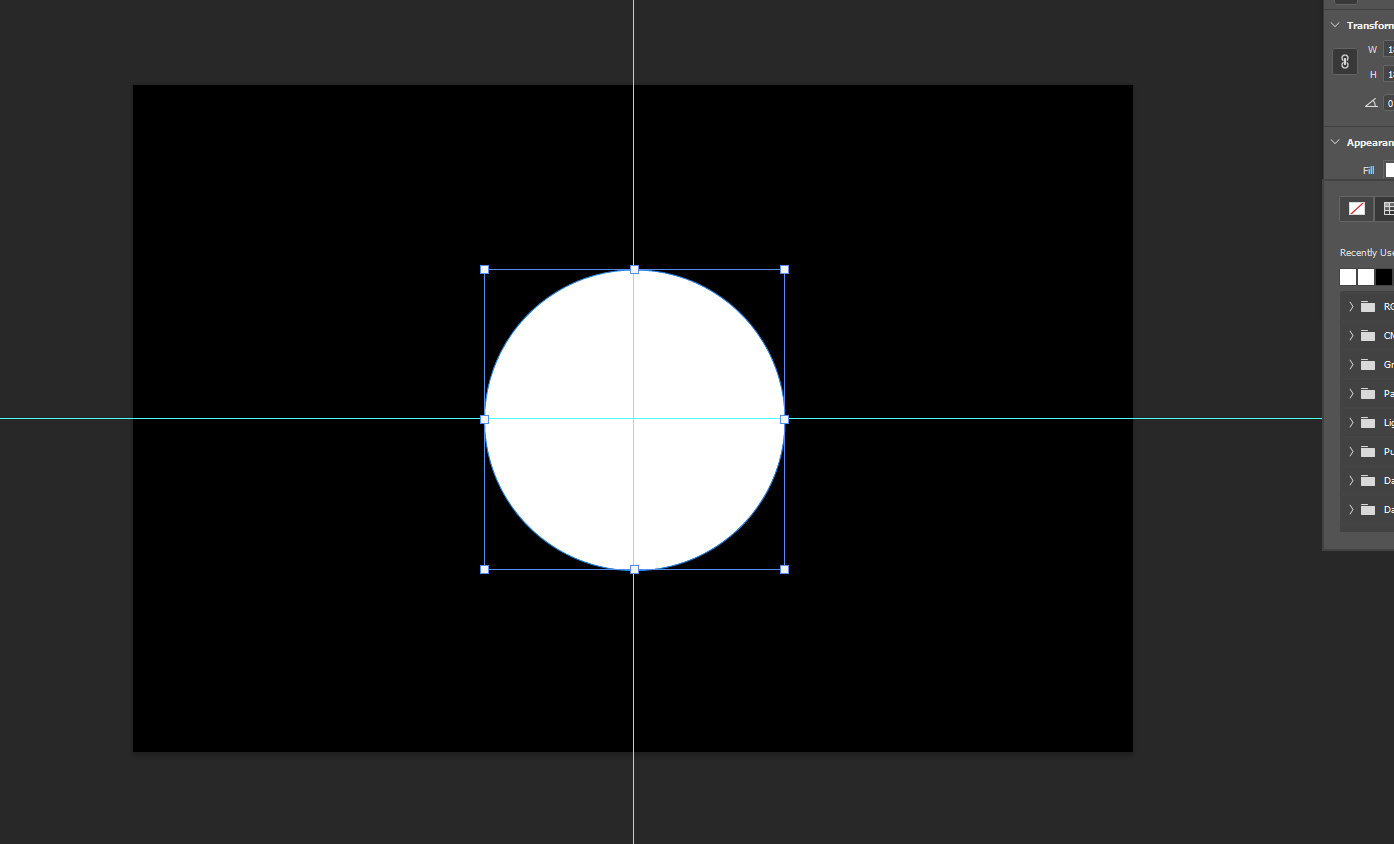
Shift keeps your ellipse perfectly round, while Alt or Option will make the center snap to the point you clicked.
MUST READ: Exploding Text Effect in Photoshop | Create Transparent Text in Photoshop
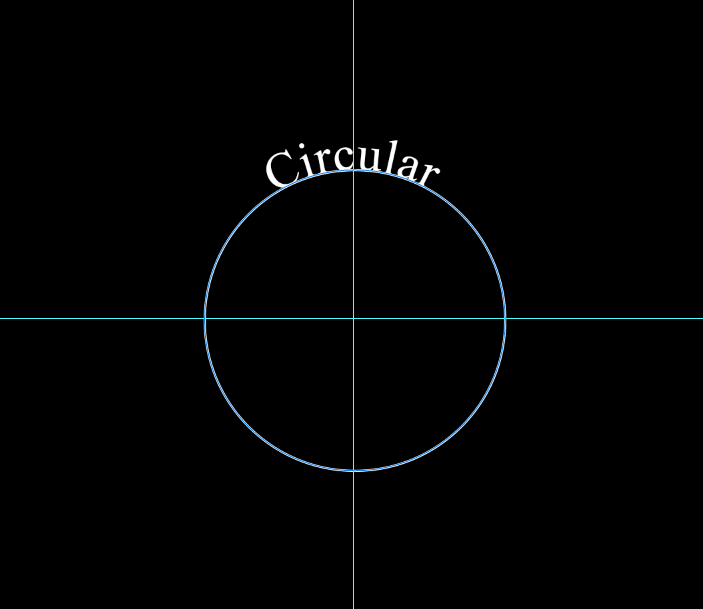
Step 3: Type Your Text
Now that you’ve got your circle, select the Horizontal Type Tool, and your cursor transforms into an intriguing capital “I” enclosed in a box.
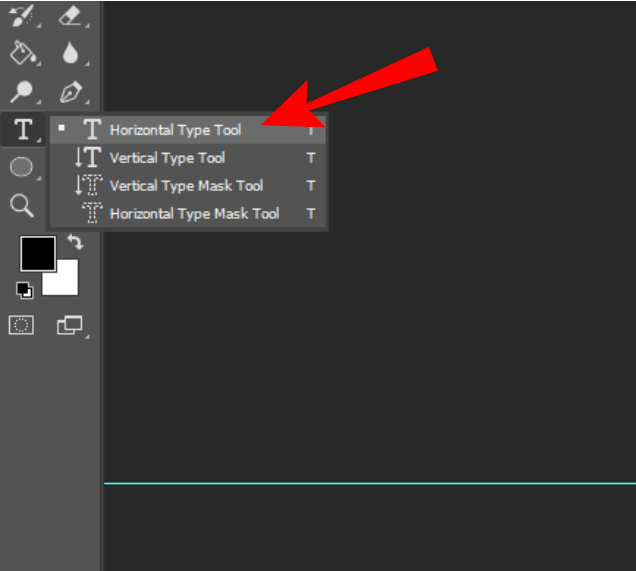
Position this cursor on the edge of your circle, waiting for the magic to happen.
When your box turns into a charming squiggly line, it’s time to work your creative magic.
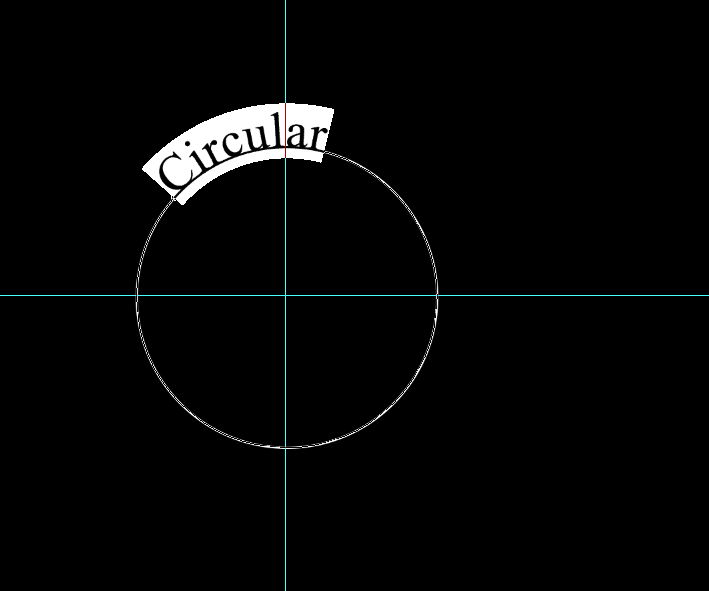
Click, and the words flow.
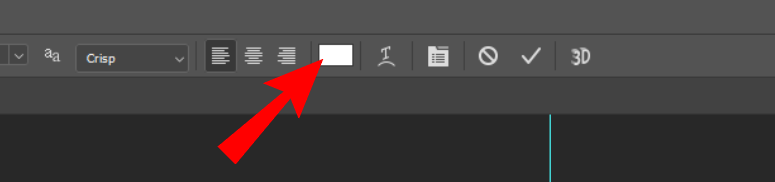
And a quick tip: If your typing isn’t yielding results, it might be a color clash. Double-check your text color in the Options bar; it might be camouflaged with the background.
Step 4: Refine Your Text
Text in a circle is a bit like clay, waiting to be sculpted. Hit the checkmark in the Options bar to accept the changes and bring out the Path Selection tool from your toolbox.
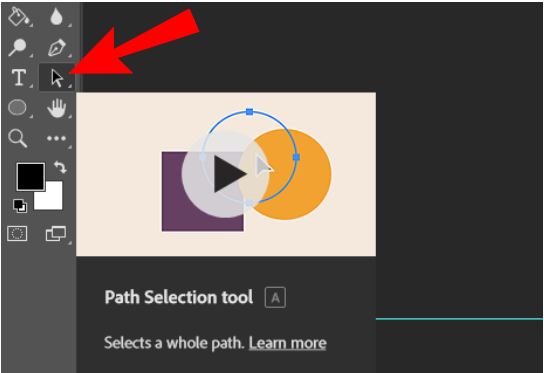
Now, let your creative hands guide the text. Grab it and start your dance. The text adheres to the circle, gracefully following its curves as you drag.
Don’t forget the extras: the font, the size, the color—all just a few clicks away in the Options bar.

Step 5: The Bottom of the Circle
But wait, there’s more! Sometimes one set of text isn’t enough for your artistic ambitions. For that, we introduce a new layer, making future adjustments a breeze.
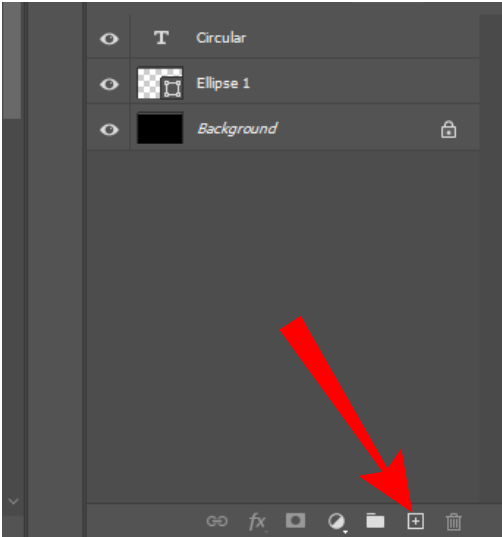
Hit the “New Layer” button at the bottom of the Layers Panel.
Back to the Ellipse tool, it’s time to craft another circle. This one should be just large enough to kiss the top of your first text layer. As always, remember your dear friends, Shift and Alt (or Option).
As you accept this shape, your first set of letters may momentarily vanish but fear not. It’s because the new layer is calling the shots.
Reach for your text layer and coax it up, placing it just above your circle layer. Release your hold, and the words reappear.

Time for your circle to shine. Select it again and call forth the Horizontal Text tool. Find that squiggly line on the circle, click, and type away.
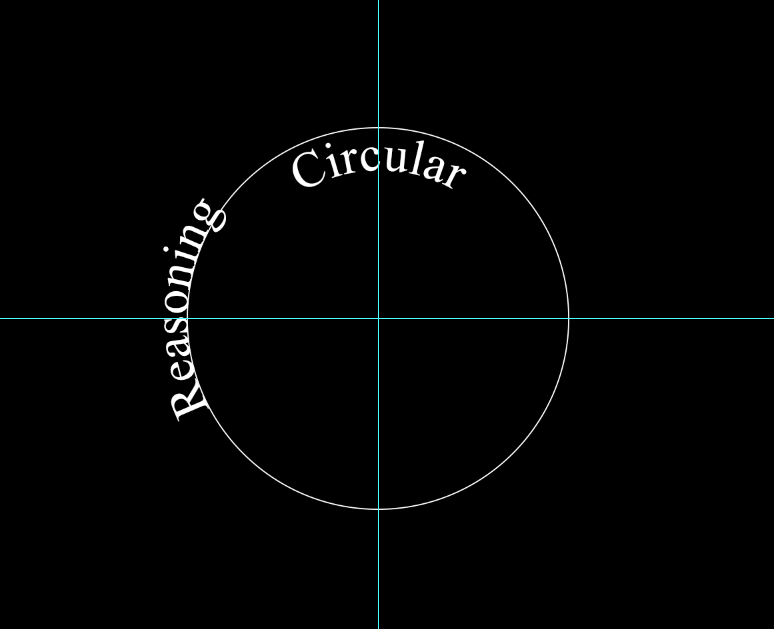
Notice that your text might have a mind of its own at first, heading in the wrong direction. This is where the Path Selection tool swoops in.
Reposition the text as you did before, but this time, give it a gentle nudge inside the circle. Magic happens!

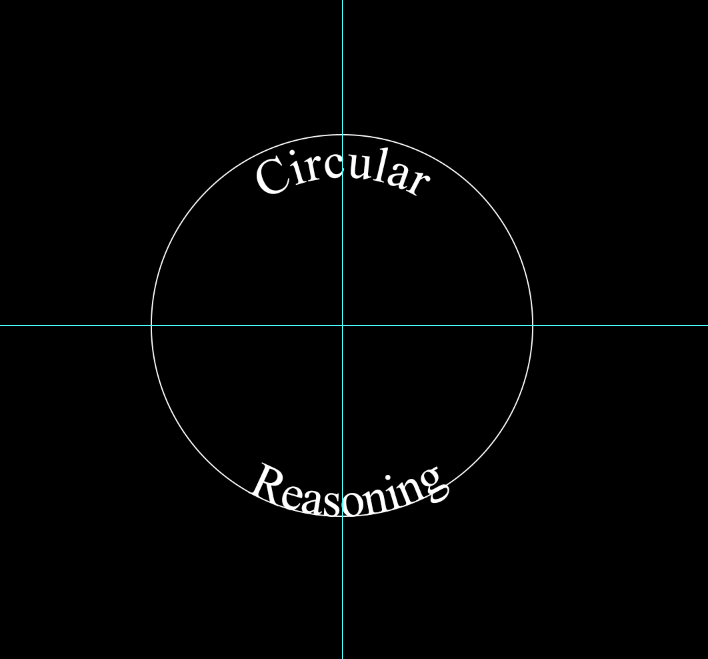
And voilà! Your creation is a testament to the beauty of “the long way is sometimes the best way”.
Conclusion
In conclusion, the journey to mastering circular text in Photoshop is one worth taking. The method we’ve explored here is your ticket to crafting flawless circular text with precision. Say goodbye to distorted letters and flattened circles, and embrace the artistry of text in a curve.
As you experiment and perfect your circular text, remember that the extra effort is always worth it for quality. Your designs will stand out, and your creativity will shine.
FAQs Related to Circular Text in Photoshop
Q1: Can I create circular text with custom fonts?
Absolutely! You have the freedom to choose your font style, adding a personal touch to your circular text.
Q2: How can I change the text’s orientation on the circle?
To change the orientation, use the Path Selection tool to reposition your text along the circle’s path. This tool allows you to explore various text placements and create the desired effect.
Q3: Can I apply different text effects to my circular text, like gradients or shadows?
Indeed, you can! Once your text is in place, you can layer on various effects like gradients, shadows, or even textures to add depth and dimension to your circular masterpiece.
Q4: What if I want to create circular text with multiple lines or paragraphs?
Creating multi-line or multi-paragraph circular text is a breeze. After you’ve typed your first line, simply hit “Enter” (or “Return” on Mac) to create a new line within the same text box. Continue typing to add more text and shape your circular story.
Q5: Can I animate circular text for videos or GIFs in Photoshop?
Absolutely! Photoshop allows you to add animation to your circular text. By creating multiple text layers and adjusting their positions over frames, you can achieve a captivating circular text animation for your videos or GIFs.
Q6: Is there a way to make the circular text appear 3D or with a bevel effect?
Certainly! You can add a 3D or bevel effect to your circular text by using layer styles in Photoshop. Experiment with bevel and emboss options, adjusting settings like depth and size to give your text that extra dimension.
Q7: What’s the best way to ensure my circular text is perfectly centered and symmetrical?
To achieve perfect centering and symmetry, consider using the “Align” options available in Photoshop. These tools will help you align your circular text with precision, making it look professionally balanced and visually appealing.
Q8: Can I create circular text on images with irregular shapes or objects?
Absolutely! Circular text isn’t confined to perfectly round shapes. You can adapt the method described in this article to create circular text around irregular shapes or objects. The process might require some adjustment, but the creative possibilities are endless.
Q9: Is there a quick way to duplicate circular text on the same image for consistency?
Yes, there is! To duplicate your circular text, simply copy and paste the text layer. You can create multiple instances of the same circular text, ensuring consistency in your design.
Q10: Can I save my circular text design as a custom template in Photoshop for future use?
Certainly! Once you’ve crafted the perfect circular text design, you can save it as a custom template in Photoshop. This way, you can easily access and reuse your circular text design in future projects, saving you time and ensuring consistency.

