Table of Contents
Create Rain Effect on Photo with Photoshop
Today you will learn to Add Rain Drops to a Photo with Photoshop. We will create Rain Effect in Photoshop using filters and adjustment layers. With the help of Photoshop Filters, you can determine the direction and amount of rain as per your photograph.

We also have a Photoshop Tutorial on Adding Falling Snow to a Photo.
Select a photo and begin with the tutorial by following the below-mentioned steps-
Step 1
Launch Adobe Photoshop and open the image as a new document.

Step 2
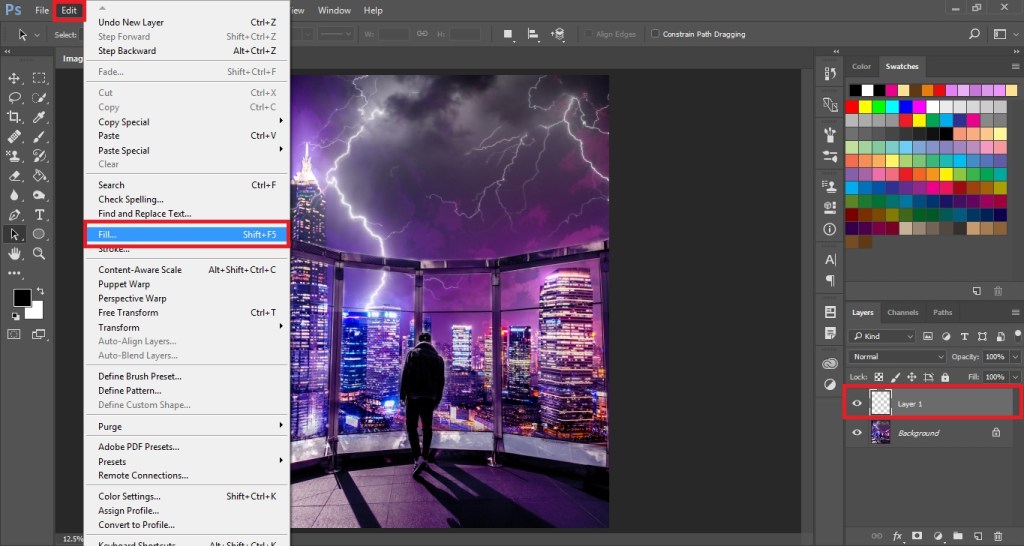
Click on Create a New Layer button in the Layers Panel. This will add a new blank layer above the background layer.

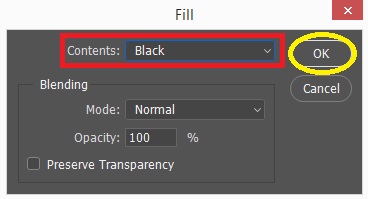
Go to Edit > Fill. In the Fill dialogue box, set the Contents to Black and click OK. The new layer created will get filled with Black color.


Step 3
Go to Filter > Noise > Add Noise.


Step 4
Go to Edit > Transform > Scale. We will make the dots bigger by scaling the Width and Height. In the Options Bar, set the Width and Height.


After making the dots bigger, crop the dots that are outside the canvas. Press Ctrl + A and go to Image > Crop. Press Ctrl + D to Deselect.
Step 5
Now change the Blending Mode of Layer 1 to Screen.

Go to Filter > Blur > Motion Blur. Set the Angle and Distance and Click OK to apply the Motion Blur filter.


Step 6
Go to Layer > New Adjustment Layer > Levels. In the New Layer dialogue box, put a checkmark on Use Previous Layer to Create Clipping Mask. We are creating Clipping Mask so that the Levels Adjustmnet Layer applies only to the layer beneath it and does not affect other layers.
Set the values of Shadow, Midtone, and Highlight in the Levels Properties Panel.


So this is how you can create Rain Effect on a Photo in Photoshop. This tutorial has made it easier for you to Add Rain Drops to a Photo with Photoshop.
Practice this Photoshop Tutorial and share your views in the comment section. Also, share this tutorial with others.

