Table of Contents
Equalizer Logo in Adobe Illustrator
Earlier we have created a Music EqualizerBackground in Adobe Illustrator and today we will create an Equalizer Logo in Adobe Illustrator. We will use Rectangle Tool, Ellipse Tool, Transform Effect, and Brushes Panel.
Launch Adobe Illustrator and create a new document. Now follow the steps:
Step 1
Select the Rectangle Tool and draw a small rectangle on the artboard. Fill the rectangle with color and turn off the Stroke color.
Step 2
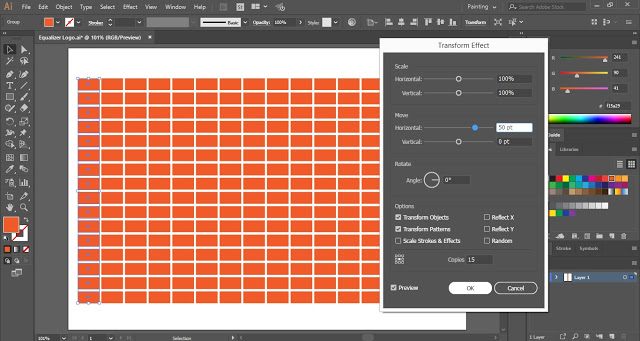
Now select the rectangle drawn and click on Effect in the Menu Bar. Place the cursor on Distort & Transform and select Transform.
Transform Effect dialogue box will appear on the artboard. Put a checkmark on Preview and enter the number of copies required. Now Vertically Move the rectangle as shown in the below image.
After making the required changes click OK.
Step 3
Select the rectangle and click on Object in the Menu Bar. Then select Expand Appearance.
Now we will horizontally move all the rectangles.
Again Expand Appearance of the rectangles.
Now Ungroup all the rectangles by pressing Shift + Ctrl + G.
Step 4
With the help of the Selection Tool, select a few rectangles randomly and remove them. We will select the rectangles both from the top side of the row and from the bottom side.
If you want you can select all the rectangles and resize them.
Step 5
Now open the Brushes Panel. Click on Window in the Menu Bar and select Brushes.
Press Ctrl + A to select all the rectangles and then click on the New Brush icon in the Brushes Panel.
When you will click on the New Brush icon, a pop-up of brush types will appear on the artboard. For all the brush types select Pattern Brush and click OK.
Pattern Brush Options dialogue box will appear on the artboard. You can give a name to your brush and then click OK.
After saving the rectangles as Pattern Brush, drag them aside.
Step 6
Now select the Ellipse Tool and draw a circle on the artboard. Turn off the Fill color for the circle and select the Stroke.
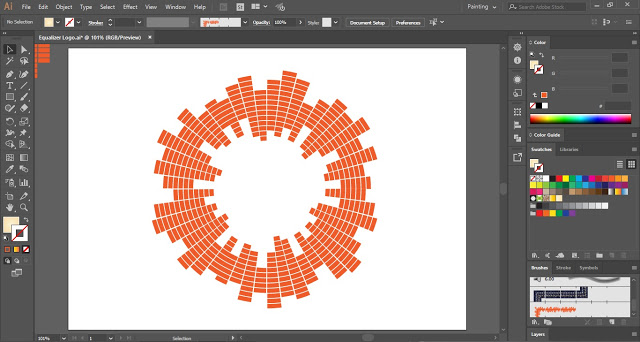
Now select the new Pattern Brush from the Brushes Panel and it will be applied to the stroke of the circle.
Your Equalizer Logo in Adobe Illustrator is ready.
Practice this tutorial and share your views in the comment section. Also, share this tutorial with others.


