

Table of Contents
How to Paint a Face in Photoshop?
Face painting is a creative and fun technique that allows you to transform and enhance portraits, photographs, and artwork using digital tools. With the powerful features of Adobe Photoshop, you can easily experiment with various face painting effects to add a touch of whimsy, fantasy, or artistic expression to your images.
Photoshop offers a wide range of tools and capabilities that can help you achieve impressive face painting effects. By utilizing brushes, layer blending modes, masks, and adjustment layers, you can apply virtual paint and create stunning designs on the faces within your images. Whether you want to create intricate patterns, animal-inspired looks, or bold artistic statements, Photoshop provides the flexibility to bring your face painting ideas to life.
Understanding the fundamentals of face painting effects is crucial to mastering this technique in Photoshop. By studying real-life face painting artistry and exploring different styles and themes, you can gain inspiration and insights into how to translate those effects into the digital realm. Learning about color theory, shading, and highlighting techniques can also greatly enhance your ability to create realistic and impactful face painting effects.
Additionally, studying tutorials and online resources can significantly expand your knowledge and skills in Photoshop face painting. These tutorials provide valuable guidance, tips, and step-by-step instructions to help you navigate the tools and techniques required for achieving various face painting effects. By following along with these resources, you can gain hands-on experience and develop a deeper understanding of how to create stunning face painting effects in Photoshop.
Experimenting with different brushes, colors, and layer blending modes is essential to achieving unique and captivating face painting effects. Photoshop allows you to work non-destructively, meaning you can easily modify and refine your face painting effects without compromising the original image. This flexibility enables you to iterate and explore different creative possibilities until you achieve the desired result.
Photoshop offers a versatile platform for exploring and creating face painting effects. By understanding the basics, seeking inspiration from real-life face painting artistry, and following tutorials and online resources, you can master the art of digital face painting. With your creativity and Photoshop’s powerful tools, you can transform ordinary portraits into extraordinary works of art that captivate and inspire.
Today we will Paint a Face in Photoshop. You will learn a quick and easy way to create a Face Painting Effect in Photoshop. With the help of this Photoshop Tutorial, you can paint any graphics on a face.

We will require two images for this tutorial; a model face image and a graphic image. You can download these images from different stock image websites.
Now follow the below-mentioned step-by-step process to create a Face Painting Effect in Photoshop.
Step 1
Open the Model image and the Graphic image in Photoshop as two different documents.


Step 2
Now select the model image document and convert the layer to Smart Object.
Layer > Smart Objects > Convert to Smart Object

Go to Layer > Duplicate Layer. Under Destination, set Document to New and Name the document as Displacement.


Click OK and the duplicate layer will open in New Document named Displacement.

Step 3
In the Displacement document, go to Filter > Blur > Gaussian Blur.


Click OK to apply Gaussian Blur.
Step 4
Go to Layer > New Adjustment Layer > Black & White.


Go to File > Save As. Save the Displacement Document in PSD format.

Step 5
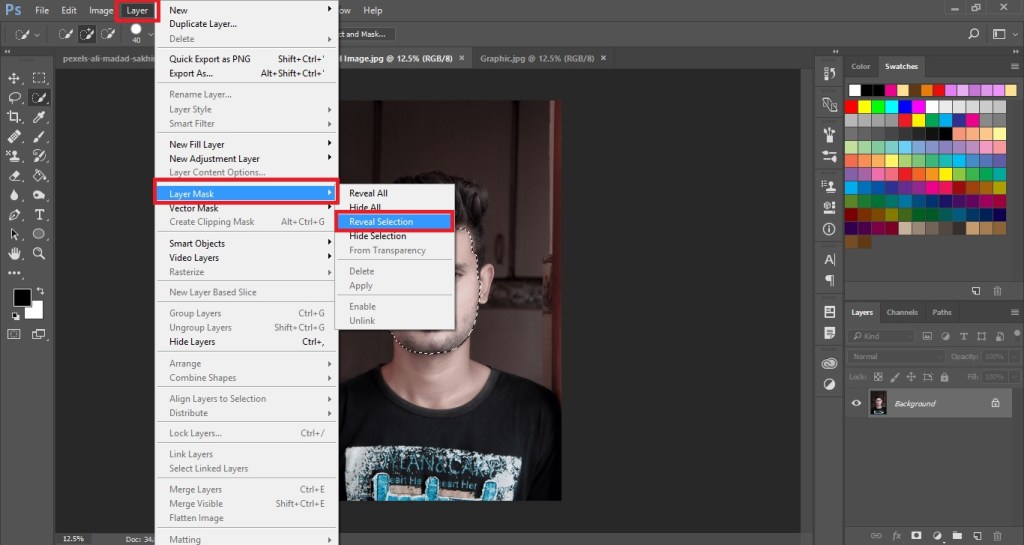
Now switch to the Model image document and select the Quick Selection Tool. With the help of the tool, select the face of the model except for the ears, hair, and neck.

Go to Layer > Layer Mask > Reveal Selection.

Step 6
Go to Layer > New Adjustment Layer > Black & White. The Black & White Adjustment Layer will get created in the Layers Panel.


Step 7
Select the Layer Mask Thumbnail in Layer 0. Then with the left click, drag the layer mask and place it on the Black and White 1 Layer Mask Thumbnail. A dialogue will appear asking you whether you want to Replace the Layer Mask. Click on Yes in the dialogue box.


Now we will select the Layer Mask Thumbnail and then the Brush Tool. Set the Foreground color as black and remove the Layer Mask from the eyes. (See the Image Below)

Step 8
Switch to the Graphic document and convert the graphic to Smart Object. Then select the Move Tool to drag and place the graphic in the Model Image document.

If required, you can transform the Graphic Image by pressing Ctrl + T. You can resize the image with the help of the Transform Tool.
Reduce the opacity of the Graphic Image to see the Model Image beneath it. Change the Blending Mode to Linear Burn.

Step 9
Go to Filter > Distort > Displace. In the Displace Dialogue Box, click OK and then Browse the Displacement File saved in PSD Format. (Step 4)

Select the Layer Mask thumbnail of the Black & White 1 Layer. Press and hold the Alt key and drag the Layer Mask in the above layer (Layer 1).


Step 10
Go to Layer > New Adjustment Layer > Vibrance.


Replace the Layer Mask in the Vibrance Adjustment Layer using the Alt Key and change the Blending Mode.

This is how you can Paint a Face in Photo with Photoshop.
Share this Face Painting Effect in Photoshop Tutorial with others. Also, share your views in the comment section.
