Table of Contents
Line Artwork in Adobe Illustrator
In Adobe Illustrator you can create abstract artwork with the help of various tools and today you will learn to create a Line Artwork with the help of Blend Tool and Transform Tool.
Step 1
Launch your Adobe Illustrator and create a new document. Now select the Pen Tool from the Tool Panel and draw the shape as shown in the below image but before that mark Fill as No Fill. Only a stroke color will be filled.
The shape must have two separate paths as we will blend them. Draw two separate shapes and place them close to each other but don’t group or join them otherwise you won’t be able to blend the shapes.
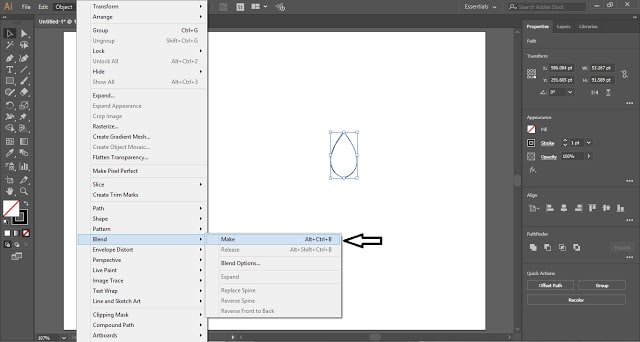
Now select the two shapes and blend them. Click on Object in the Menu Bar and place the cursor on Blend and then select Make.
Object > Blend > Make
Now double click on the Blend Tool in the Tool Panel and increase the number of Specified Steps and click OK.
Step 2
Select the blend created and hit Ctrl + C to copy the blend and then press Ctrl + F to paste in front. Now go to the Properties Panel and select Flip Along Vertical Axis.
Now select both the shapes and click on Object in the Menu Bar and place the cursor on Transform and select Rotate.
Object > Transform > Rotate
When you will select Rotate, a Rotate Dialogue Box will appear. Change the angle of rotation and click on Copy.
Step 3
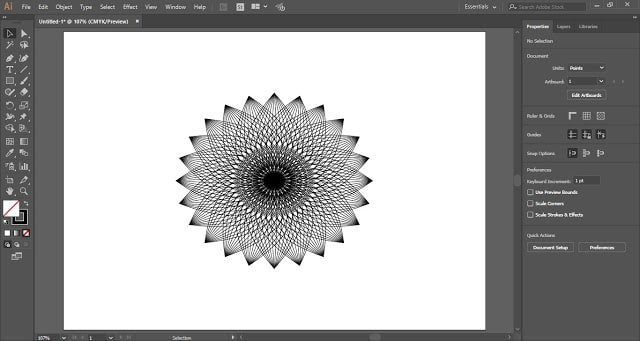
Now press Ctrl + D, the shortcut key for Transform Again, till you get your Line Artwork complete as shown in the below image.
If you want you can change the color of the stroke.
This is how in just 3 simple steps you can create an attractive Line Artwork in Adobe Illustrator.
Write your views about this tutorial in the comment section and share the tutorial with others.


