Table of Contents
Create a Doughnut with 3D effect in Adobe Illustrator
Keywords like 3D donut, donut tutorial, donut tutorial in Illustrator, Illustrator donut, donut Illustrator tutorial, tutorial Illustrator donut, and new Illustrator 3D donut open up a world of possibilities for creating realistic and visually appealing donut designs using the powerful tools of Adobe Illustrator.
With Illustrator’s versatile features and intuitive interface, you can easily craft mouthwatering 3D donut illustrations that look good enough to eat. Whether you’re a seasoned designer or a creative enthusiast, mastering the art of creating 3D donuts in Illustrator allows you to add a delightful touch to your designs, presentations, or even culinary-themed projects.
The 3D donut effect in Illustrator enables you to bring depth, dimension, and realism to your artwork. By utilizing techniques such as shading, gradients, textures, and highlights, you can create donuts that look incredibly lifelike and irresistible. With precise control over lighting and surface properties, you can achieve the perfect balance of glossiness and softness, making your donuts truly appetizing.
Adobe Illustrator provides a wide range of tools and functionalities to bring your 3D donut designs to life. From manipulating shapes and paths to applying realistic textures and colors, you have the flexibility to customize every aspect of your donut illustrations. With the ability to rotate, scale, and position objects in 3D space, you can create compelling compositions that showcase your donuts from any angle.
Tutorials, resources, and a thriving creative community are readily available to help you master the art of creating 3D donuts in Illustrator. These valuable learning materials offer inspiration, tips, and guidance, empowering you to unlock the full potential of Adobe Illustrator and create delectable donut designs that stand out.
Illustrator’s 3D donut capabilities offer a delectable opportunity to infuse your designs with a touch of realism and visual appeal. By leveraging the power of Illustrator’s tools, textures, and lighting effects, you can create mouthwatering donut illustrations that engage and delight your audience. So, roll up your sleeves, grab your creative icing, and dive into the world of 3D donut design in Adobe Illustrator. The possibilities are as endless as the flavor combinations you can imagine!
Step 1
Step 2
When you will click on Revolve, a 3D Revolve Option box will appear. Put a checkmark on Preview and manually revolve the 3D square to set your doughnut shape. Now set the offset value to 55pt.
After making the required changes, click OK.
Step 3
Now select the Pencil Tool and draw the upper layer of the donut. Now, this is the time to show your creativity. Draw the melting chocolaty layer and fill it with dark brown color.
Then select the melted chocolate shape drawn and click on Effect in the Menu Bar. Place the cursor on Stylize and select Inner Glow.
Now apply the Inner Glow Effect at the edges of the selected shape.
Step 4
Now select the melted chocolate shape and press Ctrl + C to copy the shape. Then press Ctrl + B to paste the copied shape at the back. Drag the copied shape a bit downwards.
Now select the copied shape and change its Blend Mode to Overlay in the Transparency Panel.
Step 5
Now select the Pen Tool and draw an arc shape at the left edge of the donut drawing.
Fill the arc shape with color #8b5e3c.
Step 6
Select the arc shape drawn in the above step and apply Gaussian Blur to it.
Effect > Blur > Gaussian Blur
Similarly, draw another arc shape at the right edge of the donut drawing.
Step 7
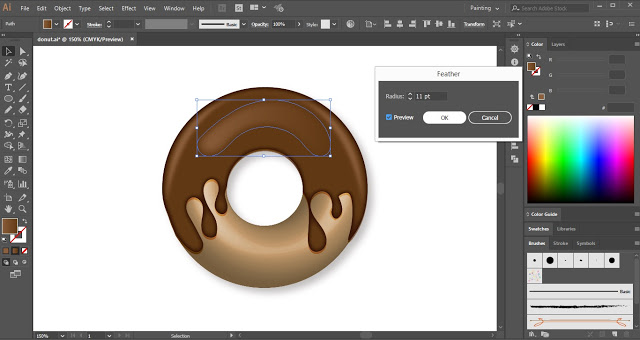
Now select the Pencil Tool from the Tool Panel and draw a shape as shown in the below image.
Fill the shape with a brown color gradient.
Let the shape be selected and apply a Feather effect to it.
Effect > Stylize > Feather
Step 8
Now we will draw some stroke lines with the help of the Pencil Tool to create an effect of melting chocolate on the donut icon.
After drawing the strokes, fill them with a gradient to create a realistic effect.
Step 9
At last, we will sprinkle some toppings on the 3D donut.
Select the Pen Tool and draw an arc shape stroke on the chocolate.
Now open the Brushes Panel and select Dot Rings Decorative Scatter Brush.
Your Chocolaty Donut in Adobe Illustrator is ready.
So this is how you can draw a donut in illustrator with the help of 3D Effect. Hope you will find this method easy to use.
To get notified about the new tutorials, follow www.vividesigning.com and share this tutorial with others. Also, write your views in the comment section.


