

Add Texture to Clothing in Photoshop
When it comes to clothing textures, Photoshop provides endless possibilities for creating unique patterns. By combining various textures, colors, and effects, you can design patterns that mimic fabrics or create abstract textures. Experiment with filters, blending modes, and adjustment layers to achieve the desired look. Additionally, Photoshop offers tools like the “Clone Stamp Tool” and the “Healing Brush Tool” to refine and edit your patterns, ensuring seamless transitions and eliminating imperfections.
Adobe Photoshop offers a range of tools and features for adding, creating, and editing patterns. Whether you want to enhance your designs with pre-installed patterns or create custom patterns for clothing textures, Photoshop provides the necessary functionality and flexibility. By utilizing the “Fill” feature, designing your own patterns, and employing various editing tools, you can bring your creative vision to life. With Photoshop’s pattern tools at your disposal, you have the power to transform your designs into visually captivating and unique masterpieces.
As you know, you can Change the Color of Objects/Clothes in Photoshop. You can also Add Patterns/Textures to Clothes in Photoshop. In just 3 simple steps, you can add a pattern to the cloth in Photoshop.
You will require a model image wearing a neutral color plain dress and a pattern image. We will use the Quick Selection Tool, Move Tool, Clipping Mask, and Blending Options to Add Patterns to Clothes in Photoshop.

Launch Adobe Photoshop and begin with the tutorial-
Step 1
Open the model image in Photoshop as a new document. In another document, open the pattern image.


Step 2
Open the model image document. Then press Ctrl + J to create a duplicate copy of the model layer. Now select the Quick Selection Tool and make a selection of the dress of the model.
After making the selection, add a Layer Mask to the duplicate layer. (See the image below)


Step 3
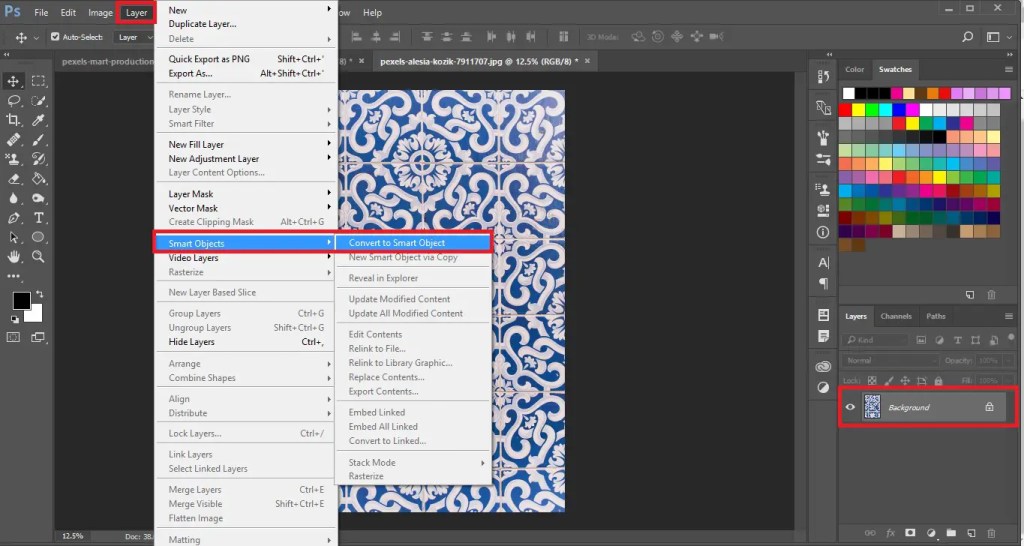
Now open the Pattern Image document and then convert the pattern layer into the smart object. With the help of the Move Tool, Drag the Pattern image and place it on the model image.
After dragging the pattern image and placing it over the model image, select the smart object layer and press Alt + Ctrl + G to Create a Clipping Mask.

Now change the Blending Mode of the Layer to Linear Burn.

This is how in just 3 easy steps, you can Add Patterns to Clothes in Photoshop.
Practice this Photoshop Tutorial and share your views in the comment section. Also, share this tutorial with others.
