

Sometimes, you want to make a star in Illustrator to add some sparkle to your logo, festive greeting card, website banner, or social media post. This unique shape blends in a geometric refinement in your overall design project to make it more appealing.
In this guide, we’ll provide easy-to-follow instructions on how to draw this design element effortlessly.
Methods To Draw a Star in Adobe Illustrator
You can design a star in Illustrator using three different methods. Each one meets different design needs and has its own advantages and drawbacks.
Method 1: Using Star Tool
The Star Tool in Illustrator quickly creates a star with adjustable radii and a customizable number of points. But, it is not ideal for very specific shapes with uneven points or irregular curves.
Method 2: Using the Pucker & Bloat Effect
The Pucker & Bloat Effect quickly transforms a rectangle or ellipse shape into a unique, sparkling 4 point star. However, this method is less intuitive and offers limited customization.
Method 3: Pen Tool
With the Pen Tool in Illustrator, you can manually create a star with full control over its shape, radii, and points. The downside is that this technique is more time-consuming than other methods.
Step-by-Step Instructions To Make a Star in Illustrator
Using the Star Tool in Adobe Illustrator is the quickest and easiest way to create a basic star compared to the other methods. Here’s how:
Step 1: Set Up the Artboard
First off, launch Adobe Illustrator and click Create New.

Enter the dimensions for your artboard size according to your needs and click Create to open the editing interface.

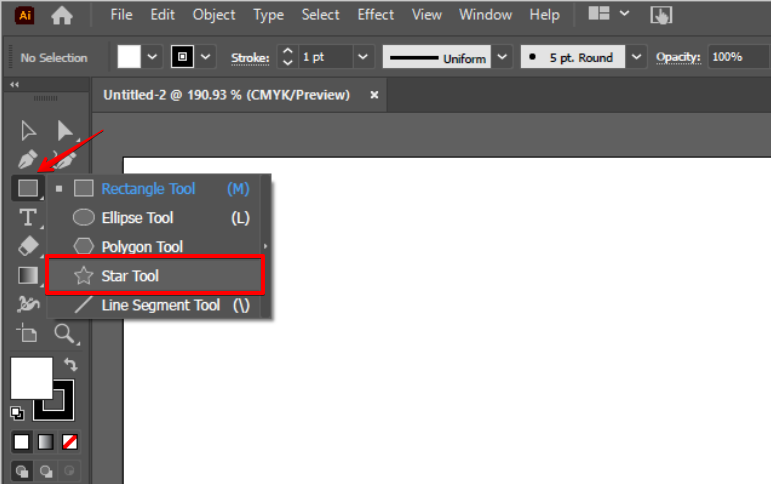
Step 2: Use the Star Tool
Locate the Star Tool in the toolbar on the left side of the screen. If you cannot find it, click and hold the Rectangle Tool (M) to see other shapes and choose the Star Tool.
Now, simply click and drag anywhere on the artboard to make a star. By default, Illustrator draws a 5 point star. Release the mouse button to complete the star.
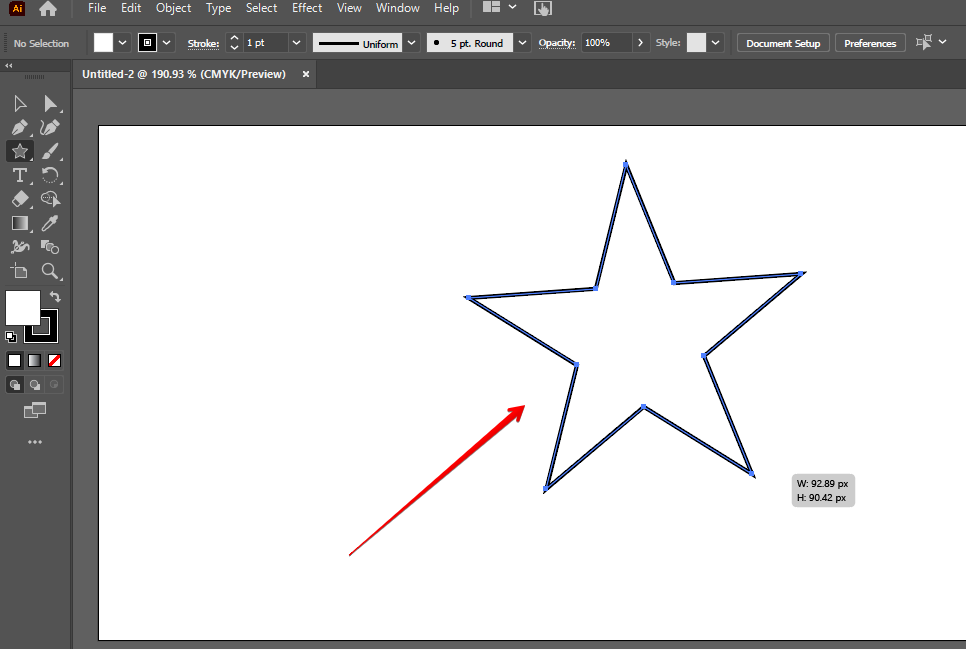
Alternatively, select the Star Tool and click on the artboard to open its settings. Then, type in the 4 or 5 next to Points, enter the Radius 1 and Radius 2 values as you desire, and click OK to make a 5 or 4 point star.

You can now use the Fill option to change the stroke color or fill the star with your intended shade.

Step 3: Export
Finally, click File in the upper menu, choose Export, and select Export As.
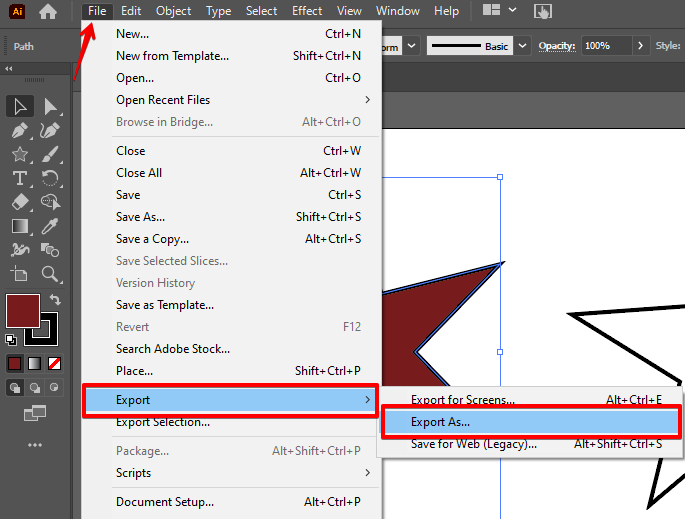
Type in the file name, select Save as Type from the drop-down menu, and choose Export to save your document on your PC.

Tips and Tricks
Use Keyboard Shortcuts For Adding More Points
Press the up & down arrow keys when dragging to create a star. This will increase or decrease the number of points dynamically and allow you to experiment with different star shapes quickly.
Use Modifier Keys
Press & hold the ALT or Option key while dragging the shape of the star to make it stand upright. To draw an equal-proportion star, press and hold the Shift key.
Layers Stars on Each Other To Create a Dynamic Effect
Try layering multiple stars with different sizes and colors on top of each other to make the design look more artistic and sophisticated.
Common Mistakes to Avoid
Overcomplicating Shapes
Adding too many points or intricate details to a star can make it look overly cluttered and reduce its aesthetic value. So always keep it simple for a cleaner design.
Ignoring Fill and Stroke
If you forget to set the fill and stroke color from the Fill menu while creating the star, it will become invisible. Make sure to choose your desired shade before using the tool.
FAQs
How Do You Make a 12-Pointed Star in Illustrator?
To make a 12-pointed star, select the Star Tool from the left menu, click on the artboard to open the pop-up window, and type in 12 next to Points. Finally, click OK to confirm, and that’s all!
How To Draw a Rounded Star in Illustrator?
Click the Star Tool to make a normal star, and use the Selection Tool (V) from the left menu panel to select it on the artboard. Now, go to Effect > Stylize > Rounded Corner, set the intended radius for the points, and click OK to apply the changes.
How To Make a Star Brush in Adobe Illustrator?
First, draw a star shape using the Star Tool and fill it with black color from the Fill menu. Then, go to Window > Brushes and click the New Brush button. In the dialog box, choose the Scatter Brush option and click OK. Now, adjust the settings as needed, set the Colorization Method to Tints to allow changing the color of the stars later, and click OK to make a star brush.
Conclusion
As we wrap things up, you’ve learned the detailed steps to make a star in Illustrator using the Star Tool.
Go on and experiment with the tips and techniques mentioned above to add shine to your basic star designs.
