Save Custom Gradients in Adobe Illustrator
When working with Adobe Illustrator, one of the key aspects of creating visually appealing designs is the ability to save and manipulate gradients. Gradients allow for the smooth transition of colors, adding depth and dimension to your artwork. In this paragraph, we will explore various techniques to save gradients and selections in Illustrator, ensuring you can effortlessly revisit and modify your work.
Adobe Illustrator provides a range of methods to save gradients, selections, and entire artworks, enabling efficient workflow management and the ability to revisit and modify your designs. By saving gradients as swatches, you can reuse them across projects, while saving selections allows you to isolate and manipulate specific objects or groups. Furthermore, combining the two techniques enables you to save gradients within selections, creating focused color transitions within your artwork. Remember to explore the various saving options in Illustrator, such as saving in the native AI format or exporting to other file formats, ensuring you have the flexibility and control to manage and share your creations effectively.
While coloring an artwork, we all create custom gradients to fill the color of our choice but do you know that you can save those custom gradients permanently for future use.
If you don’t save them then next time when you will be in need of that color you have to create it again which will consume your valuable time.
Today I am going to teach you how to save your unique gradients.
Let’s begin…
Saving a New Gradient:
First of all, draw something and fill it with custom gradients. Create your own gradient. Do not use the pre-set gradients.
After filling your drawing with a unique gradient that is not already available in the Swatches Panel, select the drawing and click on a folder-like icon in the Swatch Panel. That folder like icon is called New Color Group.
When you will click on New Color Group a window will appear. In that window, you can name that color group and you can even select the option of either creating the color group from the swatches used to create that gradient or you can select the color group from the artwork. After making changes accordingly click on OK.
After clicking OK you will notice that the color group created is appearing in the Swatches Panel but it is not permanently saved yet. When you will create a new document you will not see that color group there.
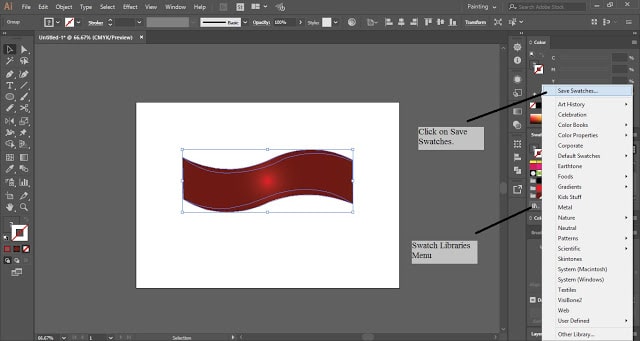
Now let’s save the new color group permanently. For that, click on the Swatch Libraries Menu. It is at the bottom left corner of the Swatches Panel. After clicking on Swatch Libraries Menu select Save Swatches.
After selecting Save Swatches, Save As Window will appear. You can rename the File Name and then Click on Save.
Now your custom gradient is saved permanently. To use this gradient in the new document follow the following process-
Select the shape ? Click on Swatch Libraries Menu in Swatches Panel ? Click on User Defined ? Select Your Saved Gradient.
This is how you can save a gradient permanently and use it in other artworks.
If you find this tutorial useful then share it with others and write in the comment section.


